![]()
![]()
![]()
![]()
![]()
![]()
![]()
![]()
![]()
![]()
![]()
 Project
X Project
X[Time for a rethink] [X Reborn] [Project X Community] [New Project X] [Nearing Completion] [Latest News] |
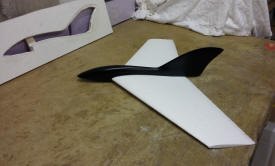
| Some time ago I purchased a small EPP
flying wing that certainly turned a few heads when taken out on the
slopes. At just 24" wingspan it may be small in stature, but BIG on its
presence and performance. it certainly got people talking, especially
when you consider the model weighed in at just 200g - all up,
great fun and it goes like the proverbial in winds topping 20mph. And so
it was, the grey matter started to work on what next.
I've always wanted to fully mould a wing, and the first model I was going to mould was / is the Evolan and maybe the Volitan thereafter. However, I got to thinking that if I am to venture down the moulded wing route, then I could do with finding a small project on which to cut my teeth so to speak. Something, that wouldn't take too much effort, whilst keeping the cost of material down while I'm learning the necessary skills. This is where the thought of creating
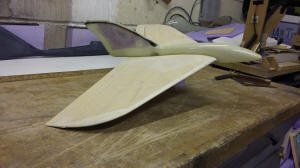
my own mini flying wing comes in and once proven through a few quick
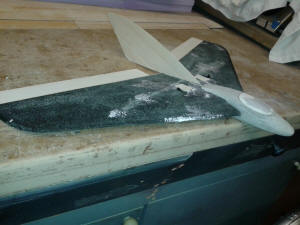
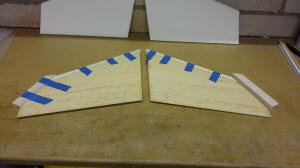
concept foamy models, then its jut a matter of creating a mould. A foam wing and pod soon came off the drawing board and I there was no delay in introducing a block of foam to the CNC foam cutter. MH45 was the chosen aerofoil, 24" wingspan and a lost foam - epoxy glass pod to sit on the front. I used some off cuts of Epp to make my wing, indeed these off cuts, were the waste outer packing from a SAS Wild Thing. Well, I didn't have any EPP in my stock of foam and these packing pieces just seemed to be too good an offer to refuse. Carefully aligned in the CNC foam cutter and two nice Epp foam wing panels and a pod from Jackodor (Close Cell Foam) to be glassed and fitted later. The model didn't take long to put together, the longest part was waiting for the epoxy glass to cure on the lost foam pod.
I passed this initial model on to a friend to play with whilst I considered the next phase..... I considered that the original wing at just 8%, the camber of the MH45 wing section wasn't quite up to generating an abundance of lift, hence needing a good wind and to be flown fast. So back to the drawing board and a little head scratching as I wanted something that would have a reasonable performance in light conditions and which comes alive in higher winds. I could have increased the camber to 9 - 10% on the original wing section, but I wasn't happy with the amount of reflex flying wings often required to perform. After watching a few videos on YouTube, I came across a model that was trimmed to fly in with zero additional reflex from the designed aerofoil section PW51. the model performed with amazing speed and was used for DS'ing. I thought that I'd got to give this wing section a go so after a fairly quick search on the Internet I found the necessary coordinates and promptly downloaded these and fed them into Profili 2 after which, I was then able to export file into my wing cutter. Project Xmk2
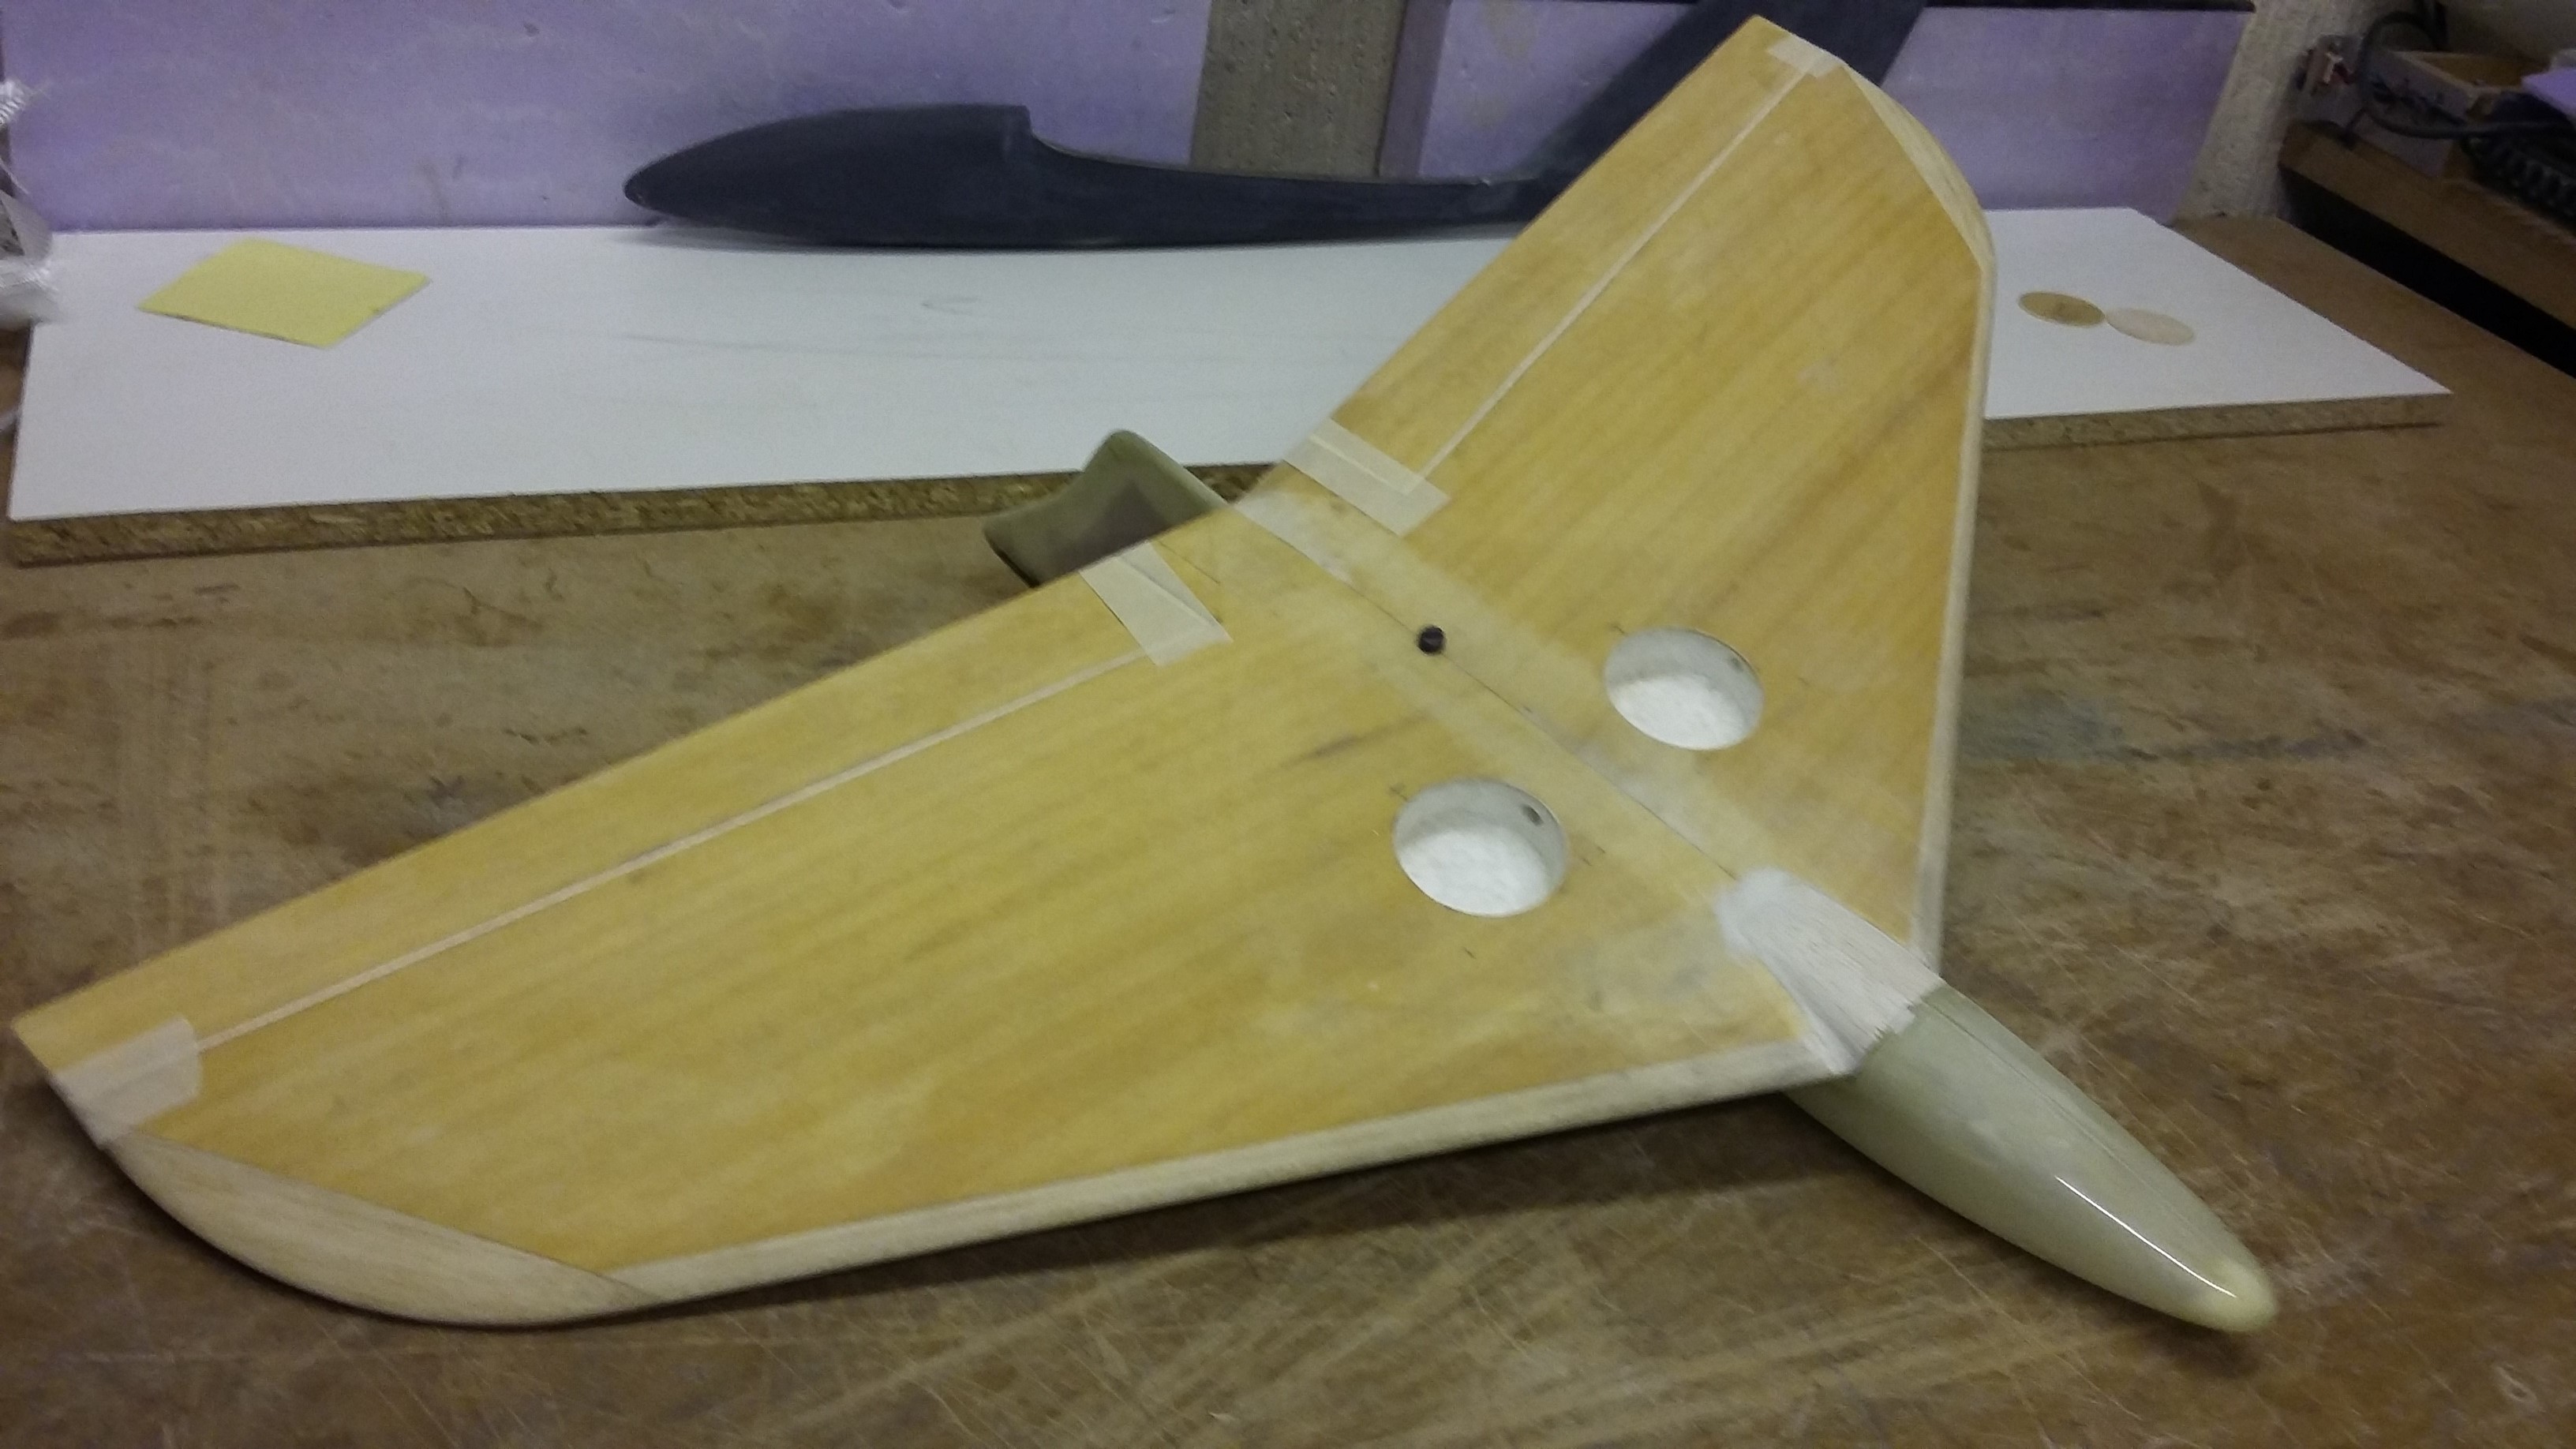
After a couple of strips of Carbon tape applied to the wing to provide a degree of rigidity the whole model was covered in lightweight glass cloth and epoxy resin, and the 1.5mm balsa fin also glassed. The front fuselage was hollowed out to make room for the Receiver and a 300mA battery. A couple of small servos embedded into the top of the wing and it was ready for an outing. I wasn't interested in painting the model at this stage, it would just add weight and I wanted to get out and fly...... well, it is a flying test bed after all. The first flight was with a warm and very light Easterly wind. So calm that even the para gliders were having problems getting into the air, so what hope did I have. I had checked out the conditions previously with my Mini Milan and found that whilst there was little wind, the conditions favoured some light thermal activity which kept the lift fairly buoyant close in for short periods of time.
I have this week taken a few days extra holiday before jetting off somewhere nice. so it was that on Monday - given a much better forecast and higher wind speed I ventured back to the Easterly face of Parlick to get a few more flight under my belt. First airborn was the Evolan to check out the conditions. The wind was swinging round to the South and with it the lift was getting better. The Project Mk2 was again launched, flown, landed a few time each time tweaking the C of G, control movements until I felt I'd found the optimum set up. I even added more ballast to feel what the model would be like in the strengthening winds. All out at 245g the model performs really well. There's more play time required before I can say the design is ready for moulding, but I feel I'm well on the way... Got to go pack the case but I'll be back soon.
|
| Total rethink....... |
I'm back having had a really good
holiday in Italy and having had time to have a bit of a Thunk......
(Intended Typo).
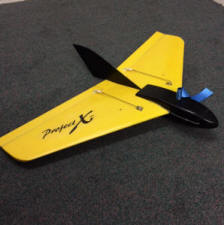
 Project X has been a good exercise in testing different wing sections, playing around with different reflex settings by tweaking the C of G and the all up weight and control settings, all in the attempt to get the best out of the model. The performance has been good but I have not been bowled over with its aesthetics. I suppose I wanted something that would turn heads not just from the way it flies but how it looks, I want it to look special. Therefore, I have decided not to continue with Project X at this time in favour of something a little more visually appealing [X2], although some of you may think there is nothing wrong with the way the model looks. You are right of course, but I want something a little different. so the X2 is next venture into achieving that little bit of something special. It's not got a name yet, but follow the link or click on the picture to go to the associated web page. |
| Back to the Project X.....
Recently
I met a couple of good friends at our first indoor session of the winter season. Well, it's not quite winter yet but it is getting dark in the evenings
and the weather is bound to take a turn for the worst very soon.........
doesn't stop me getting out on the slopes at the weekends though. Although our indoor sessions
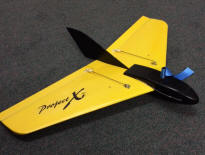
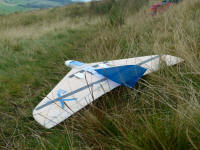
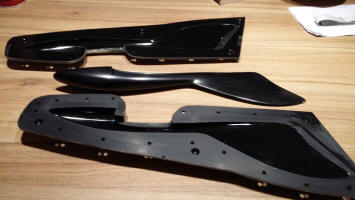
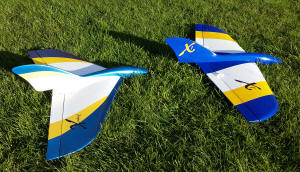
do give us a good excuse to get some mid week evening stick time. Anyway, these guys had previously taken a set of the Project X wing panels and assembled them, and have flown them so much that they had worn them out. I might add that the closed cell foam cores had only been covered in film on one model, the other used to learn the skills of applying glass cloth and resin.. So I had cut them another couple of sets of wing panels for the Project X and a lump of foam to form the fuselage pod to replace their well used and now ageing models. The end result speaks for itself in the attached photo. Great looking model! I await the photo of the second model, but this one looks good. Given that I have also passed on a few of my previous prototype models, this has led me to think of a few options. I am considering taking the fuselage from the X2 model design and mating it with the Project X wing. Mmm, watch this space ---. I'll make one, once the X2 fuselage mould has been completed and I will report back soon.
So much to do..... this is yet another model to progress, although I think I will keep this to foam veneered wings rather than making it a fully moulded model. No time to waste, now back to the workshop - I've got the X2 to progress and a set of foam cores to veneer....... C U soon.
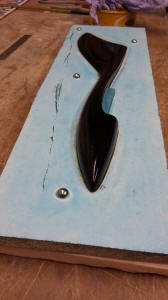
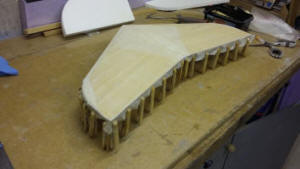
The wing panels are very rigid and I am quite please with the outcome, weighing in at 80g each. Once I have put in the wire conduit for the wing servos, then these can be joined and finished with another layer of 25g cloth. Then the Elevons can be cut out and finished. The fuselage plug has now been mounted in readiness to start making the mould, but we are a little way off from producing a fuselage, but I will report back with the progress of this.
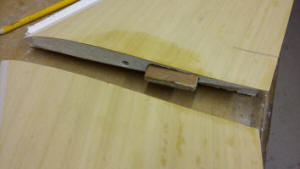
The fuselage mould is now nearing competition. The two halves of the mould have now been split open and the plug removed. I'm very please with the outcome. The mould just needs trimming and polishing and it will be ready to lay up the first fuselage.
See the X2 page for more photos
I have also been progressing the wing for the first to pair up with the new fuselage.
The whole wing has now been covered in a layer of 25g cloth overlapped around the panel join and epoxy resin. This is currently curing before the Elevons and recess for the servos are cut out, hopefully in the coming week. I hope to lay up the first fuselage in a week or so. so you never know, I may have a new model to test fly before Xmas.
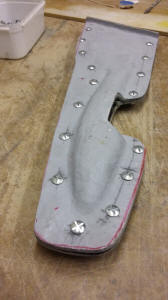
Dec 16 I'm making good headway on the new model. The wing is nearing completion and almost ready for painting and servo installation, I have just inserted the vac formed servo liners. The first fuselage has also been moulded. It was a little fiddly to lay up being so small, but the outcome is good. Over night in the airing cupboard and the next day all was revealed. It looks a little untidy when you first open the mould. the mess is essentiallya mix of excess resin (swarf) and PVA release agent that will wash off in warm soapy water. Once the fus is extracted and the swarf removed, the results are good. This fuselage was done in clear resin so I could identify any areas of the lay up that may give cause for concern but I am encouraged that I got it right, making sure that I spent a little time laying up glass tows into the sharp features - wing seat fin leading edge which would normal cause problems before laying up the glass cloth.
The fuselage is strong especially given that I have inlaid some foam in the fin to reduce flexibility. I will be looking to paint the next one in the mould to see if I can get the quality for an already painted fuselage, I have already prepped the mould for the next one applying release agent in readiness.
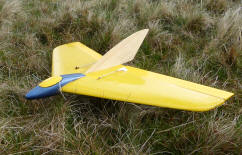
Predominantly becalmed conditions has meant I have not been flying much, although flying the X-1 on gummers How in the Lakes on Christmas day was a blast. 40+ mph winds, the conditions a little too wild for my Weasel model but the X-1 just needed a couple of clicks of down elevator and the model just came alive, great fun!.... the Festive picnic that followed with a view of Lake Windermere was a great finale to a fantastic day out.. but I digress...... Progress of my current building projects has been good. The Evolan fuselage plug has been mounted on to the parting board and the first half of the mould has been completed. More polishing now before progressing the second half of the mould. The X2 Wing plug parting board has been made and now mated to the wing Plug. More polishing here too before starting the wing mould.
I have taken quite a considerable time
working out a number of colour schemes for the Project X and have been
quite uncertain which I
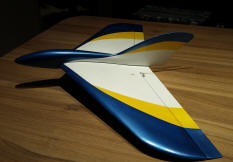
I have completed the job now and the wing servo mounts are already installed, so kitting the model out with radio gear should not take more than a couple of hours and we'll be ready for a maiden flight. Hope you like the chosen colour scheme, I think it suits the model and should stand out quite well. I will be back with news of the test flight in due course.
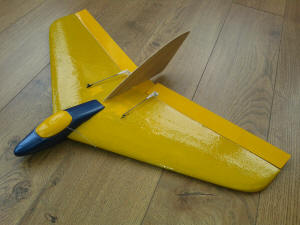
It's the first weekend in Jan 17, and the
Project X along with my new Midge is now ready for its maiden flight.
The Radio installation is easy on this model, the wing servos are the
trickiest part due to the fact I have kept as much of the elevon pushrod
within the wing, but once these are in and the covers installed, then all
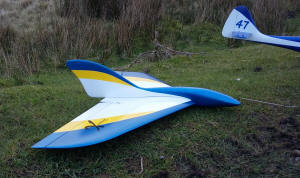
that is left is to put the battery, receiver and switch in the fuselage. I initially installed an 800mAh batter but this required nose weight to balance correctly. So, out with the small battery and installed one of my many 2/3 AF 1600mAh batteries and a standard receiver and the model balances perfectly without any additional lead. The model weighs in at just a tad over 1lb (0.5 oz) (475g) giving a wing loading of 13oz/ ft Sq, which I'm really please with. In fact this is less than the new Midge, but not a lightly loaded as my prototype X-1 but this is a different model and I didn't build it for light conditions. This weekend had been wet with low cloud and drizzly rain and very light winds. The forecast is better for mid week with higher wind speeds predicted but as usual work gets in the way. When It's had its first flights I will certainly be coming back to let you know how it went. Here we are and its mid April, and the weather gods have finally seen fit to change the bias of good weather from midweek to the weekends - Hurrah!!! and about time too! Sorry, enough of the grouching, I have now had the Project X out on the slopes and after a few sessions of trimming I am now getting close to getting this model sorted. The model penetrates well and is quite stable in pitch, roll rate is good but I still need a to tweak the differential a bit more to get the rolls really axial. Having flown the X from a number of different slopes now the model does come alive in the presence of increased compression on the front of the slope and on my local slope in good winds its performance is pleasing. Today on quite a windy day up on the Leek and Moorland site (LMMGA) the model felt clumsy. It penetrated well, but with the wind speed gusting in excess of 25mph and varying slightly in direction, did not present the model at its best, and the wonky rolls certainly needs some attention or maybe I should stop pulling in elevator when wanting to roll quickly, some more exponential may also help here I think. This is still work in progress but I feel that I am being a little over critical, as I want it to be just right and it will be in time with a little more fettling.
|
| Project X Community
|

 Two
weeks on with the model being finished in some left-over solar film it
was time for its outing. The model was taken up onto my local slope. The
model topped out at 145g including all the gear. Mini Rx, a 500mA smart
Lipo. but on the day, whilst it flew well enough, it lacked the pizzazz
of my previous foamy. I tweaked the Centre of Gravity and eventually
decided that it was far too light. Therefore, I added some ballast on
the C of G to bring it up to around 200g. What a transformation!
Now able to groove around and perform the loops that previously it just
... well it just didn't perform. Now I'd got something that had some
performance. After quite a few outings on different slopes the model is
good, but in lighter conditions, the Project X lacks a little something,
but in conditions with winds 10mph plus then we have a contender.
Two
weeks on with the model being finished in some left-over solar film it
was time for its outing. The model was taken up onto my local slope. The
model topped out at 145g including all the gear. Mini Rx, a 500mA smart
Lipo. but on the day, whilst it flew well enough, it lacked the pizzazz
of my previous foamy. I tweaked the Centre of Gravity and eventually
decided that it was far too light. Therefore, I added some ballast on
the C of G to bring it up to around 200g. What a transformation!
Now able to groove around and perform the loops that previously it just
... well it just didn't perform. Now I'd got something that had some
performance. After quite a few outings on different slopes the model is
good, but in lighter conditions, the Project X lacks a little something,
but in conditions with winds 10mph plus then we have a contender.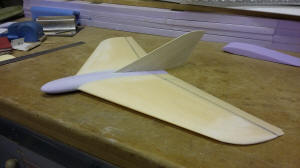
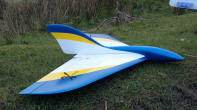
 A
slight change in design , now 26", the extra wingspan coming from the
centre section that is the integral fuselage pod. Both pod and wings are
of the PW51 wing section and blended together in Jackodor foam.
A
slight change in design , now 26", the extra wingspan coming from the
centre section that is the integral fuselage pod. Both pod and wings are
of the PW51 wing section and blended together in Jackodor foam.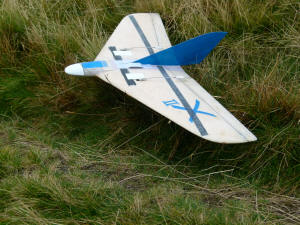 I
decided to launched the Mk2, if nothing else to get it trimmed for level
flight. It flew straight and true with just a smidgen of reflex dial in.
I was surprised that it flew at a good pace and held its own in the
light conditions, clearly the wing working well. A few forced landings
due to the light conditions saw me getting quite familiar with the
handling qualities of the model. The lift and wind did eventually pick
up later in the morning but given the number of para gliders around all
wanting to get air born in the same space as everyone else, I took a
steady stroll back to the car, model intact and very please with the
morning's outing.
I
decided to launched the Mk2, if nothing else to get it trimmed for level
flight. It flew straight and true with just a smidgen of reflex dial in.
I was surprised that it flew at a good pace and held its own in the
light conditions, clearly the wing working well. A few forced landings
due to the light conditions saw me getting quite familiar with the
handling qualities of the model. The lift and wind did eventually pick
up later in the morning but given the number of para gliders around all
wanting to get air born in the same space as everyone else, I took a
steady stroll back to the car, model intact and very please with the
morning's outing.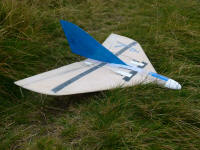

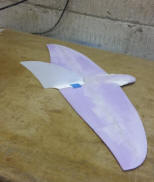
 Thought
I would share my vision for the Project X. Whilst I haven't finished
making the mould for the X2 fuselage yet, I wanted to see what it would
look like with this married up to a set of Project X wings. Given
a few minutes to cut a set of white foam cores and then offer up the
Fuselage plug, I think you'll get the idea of what I have in mind; and,
for what its worth, I now quite like the shape. Totally different to the
X2 and now quite pleasing to the eye.
Thought
I would share my vision for the Project X. Whilst I haven't finished
making the mould for the X2 fuselage yet, I wanted to see what it would
look like with this married up to a set of Project X wings. Given
a few minutes to cut a set of white foam cores and then offer up the
Fuselage plug, I think you'll get the idea of what I have in mind; and,
for what its worth, I now quite like the shape. Totally different to the
X2 and now quite pleasing to the eye.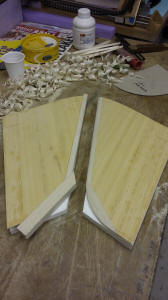
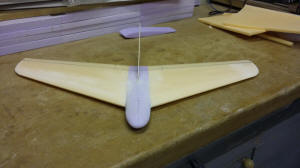
 The
wings are now coming along nicely for the new model. I
have veneered the white foam cores
with obechi veneer and 1 layer of 25g glass cloth and epoxy resin and
Vac bagged overnight, and have glued a balsa leading edge and wing tip
which have been planed and sanded to shape.
It's amazing just how therapeutic a little balsa bashing can
be.......... and look at all the shavings......
The
wings are now coming along nicely for the new model. I
have veneered the white foam cores
with obechi veneer and 1 layer of 25g glass cloth and epoxy resin and
Vac bagged overnight, and have glued a balsa leading edge and wing tip
which have been planed and sanded to shape.
It's amazing just how therapeutic a little balsa bashing can
be.......... and look at all the shavings......
 The
wing panels were joined having inlaid a plywood block to allow a decent
seat for the wing bolt which will pass through the wing into the
fuselage.
The
wing panels were joined having inlaid a plywood block to allow a decent
seat for the wing bolt which will pass through the wing into the
fuselage.


 should chose as I like most of what I've come up
with. Decision made, and given I do not have a dedicated spray room I
have found the recent temperatures not conducive to painting, but I have
managed, albeit slowly, to progress the Project X.
should chose as I like most of what I've come up
with. Decision made, and given I do not have a dedicated spray room I
have found the recent temperatures not conducive to painting, but I have
managed, albeit slowly, to progress the Project X.
 However,
I have also finished the X-1 model which, given only two outings this
week, is in danger of significantly overshadowing the project X, not
just in the way it looks but also in its amazing performance, the wind
on the Leek and Moorland site today presenting no problems for the
X-1 and I predict that this model that will be taking up a lot of my time over the
next few weeks. To find out more go to the
However,
I have also finished the X-1 model which, given only two outings this
week, is in danger of significantly overshadowing the project X, not
just in the way it looks but also in its amazing performance, the wind
on the Leek and Moorland site today presenting no problems for the
X-1 and I predict that this model that will be taking up a lot of my time over the
next few weeks. To find out more go to the