|


| |
|
Genesis II
CW's Blog |
|
|
BLOG:
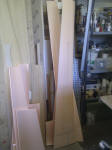
Clearing the Workshop,
And So it Begins,
Genesis gets wings,
A Mould is Created! Genesis is Born,
Genesis 2 is born,
Genesis - The other one,
11 Jul 12 - Small things,
First Flight Genesis No2,
Video
Roll Control,
Pilot Ready,
A Paint Job,
Airbrakes,
Ready to go,
Forecast good,
Still Waiting,
And still we wait, Wind
Beneath Her Wings (Jun 13)
Latest Entries: One
Year on....Jun 14 , Aug 14,
Genesis on Aerotow...Jun 2015 |
|
Introduction
During the run up to
Christmas, a very good friend and flying buddy, Neil Tricker
joined me up here in the NW for a spot of pre Christmas modelling indulgence. The weather was
not particularly kind to us, but we did manage a couple of
hours flying at Beacon Fell in the low cloud / and mist.
This was the first time I had flown from Beacon Fell and did
not know, until the day, that a blow of over 15 mph, (it was
gusting 25mph) that conditions get quite turbulent. But this
actually increased the level of enjoyment with the
Dreamflight Weasel’s we had prepared. Never laughed so
much….. and no broken models either.
spot of pre Christmas modelling indulgence. The weather was
not particularly kind to us, but we did manage a couple of
hours flying at Beacon Fell in the low cloud / and mist.
This was the first time I had flown from Beacon Fell and did
not know, until the day, that a blow of over 15 mph, (it was
gusting 25mph) that conditions get quite turbulent. But this
actually increased the level of enjoyment with the
Dreamflight Weasel’s we had prepared. Never laughed so
much….. and no broken models either.
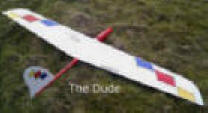
The following day saw us up on Parlick enjoying big sky
antics with various models including a small scale high
aspect scale (ish) glider – Speed Astir. Epoxy glass
fuselage for which I produced the plug for the mould, and
solid Balsa wings. The model has no moving
tail controls or Ailerons, Instead, it utilised Pitcherons.
That’s wing twist to you and I, which when moved in opposite
directions provide roll control and moving them in the same
direction provide Pitch control….. I now have fuselage to
make one of these myself, what a nice model, A full report
of the flying activity can be found on the
www.RAFMAA.co.uk website under “news”. “In the bleak
mid-winter”
 However,
it was during the Wednesday evening (Winter Solstice) that
this blog begins as we discussed the events that we attended
during 2011 and what we may attend throughout the New Year.
One such event which we attend last year was the Leek and
Moorland scale fly-in. Last year I built a 1/5th Scale
Pilatus B4, a lovely 3 metre model that really didn’t take
that long to build from the Simprop kit; an excellent first
scale model. Neil has a number of different scale models,
new and old. However, for the next scale event we decided
that we needed something different to fly, a challenge!
Something that was unusual. However,
it was during the Wednesday evening (Winter Solstice) that
this blog begins as we discussed the events that we attended
during 2011 and what we may attend throughout the New Year.
One such event which we attend last year was the Leek and
Moorland scale fly-in. Last year I built a 1/5th Scale
Pilatus B4, a lovely 3 metre model that really didn’t take
that long to build from the Simprop kit; an excellent first
scale model. Neil has a number of different scale models,
new and old. However, for the next scale event we decided
that we needed something different to fly, a challenge!
Something that was unusual.
Having perused the
www.sailplanedirectory.com web site, we came across the
SB13 flying wing…. Definitely a shape to drool over.
However, as more of the festive liquid was consumed and
realisation that the SB13 may be a little more complex than
ideal for our 1st joint scale venture, we looked for other
possible candidates and eventually stumbled
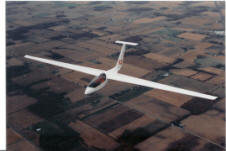
across the
Genesis Glider. Still a flying wing but with a small
stabiliser on top of the fin. A little more conventional,
but still not the run of the mill glass ship.
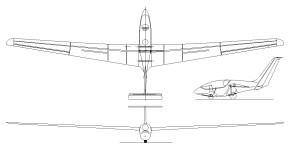
After some significant
research over the Christmas break and a few emails, I
received a few photos and a cad drawing of Genesis 2
sailplane from Jim Marske, the designer.
|
|
Genesis 2 |
|
 |
|
 |
|
A little tweaking of the CAD
drawings with the help from Andy Holden, got me visualising
a ¼ scale project beating up the slopes like in the scene
from the Thomas Crown affair……. At a full size span of 15
metres, ¼ scale makes for a large (3.75m) but manageable
size for a model sailplane. I won’t need to squeeze the
radio in to this one! Yes, one could consider its too big,
indeed my partner took a sharp intake of breath when I
demonstrated the size of the model compared to the Pilatus,
even that’s big. But hey, it could be worse; I could have
gone 1/3rd scale (5m). ;-) Having discussed such thing as
Construction methods, wing sections etc at length with Neil
we are both committed to producing two of these models. I am
to produce the Fibre Glass Fuselage and Neil will produce
the wing cores (Foam) and canopy. Then we will both finish
off the wing construction and assembly on our own, all
before the event in August.
This blog will be a periodic progress report on the
development and construction with photos; a disciplined
approach to taking photos and notes throughout the process
of building new model from scratch.
|
|
A few ideas have come to mind
how I can make a plug (Plug - a 3 dimensional shape from
which to make a fibreglass mould).
One such method would definitely be high tech; 3D printing,
creating a shape from polymers using heat or light, or even
putting a block of foam on a CNC machining and rout it to
shape. But I do not have the facilities. I have previously
made smaller plugs from solid MDF (Jart / Speed Astir /
Dude), but not wanting to give myself a hernia lifting this
one up, as the fuselage will be a little over a metre long
and half metre High, I have chosen to put some sheet MDF
around a centre core of foam and carve this to shape.......
or that is the current thought. I need to clear the
workshop, so I can give this a little more thought before I
make a start.
watch this space for the
Progress on the Genesis 2............................
Colin W |
|
(10
Jan 12) Clearing the
workshop.
|
|
I have just got a few small
projects to finish;
1. Re assembly of the Weasel – I decided to re cover the
model as I had used the wrong acrylic resin on the tissue.
Yes tissue, the resultant finish was good, but not
impervious to cold damp conditions, and a coat of exterior
varnish did not meet with my expectations. All done now,
just need to pour the radio back in it. Give me a couple of
hours and it’ll be done.
2. Repair of the Speedo Thermo glider that unfortunately met
with a mid air with a “Thing” flying wing during our Winter
Solstice outing on Parlick. Just to fix the tailplane back
on now. Another couple of hours.
3. Lastly, finish off a new model called the “Solange” – low
wing aerobatic model. Built up fuselage, foam wings, It is
now covered in epoxy glass. I just need to paint and put
some gear in to it. Then its clean down the worktops and I
will be ready to start the new project. A week or so for
this one! In the mean time, My mind is working out how I can
progress the Genesis fuselage.
|
|
(14/01/12) |
|
Weasel now finished. Gear
Installed, it has come out a little heavier that the
original, but that was to be expected, given that I had to
strip off the old tissue and reapply new covering - just
need to fly it again..
Speedo Thermo tailplane now
painted - just need to glue back on to the fuselage.
Solange coming along, first
coat of paint applied and about to rub down - not sure of
the colour scheme though. |
|
(24/01/12) |
|
 Decision
made on the Solange colour scheme, and most of painting now
done, just a final rub down and lacquer required. A few
evenings this week should have that sorted and then the
weekend for the Radio installation. Decision
made on the Solange colour scheme, and most of painting now
done, just a final rub down and lacquer required. A few
evenings this week should have that sorted and then the
weekend for the Radio installation.
Had a mishap with one of my
shockie models at yesterdays Warton indoor evening. I could
repair it, but it will take less time to make a new one. I
hope to take some photos of the assembly this time so I can
pull together an article on how to make the indoor models
with the help of Andy Holden. I can do this at the same time
as the Solange so, it should also be done by the end of the
weekend.
Hopefully, I can get the
planning for the Genesis Fuselage sorted and make a start on
the Plug next week. Lots to think about, current thoughts
are on how to operate the tail stabiliser and yet keep it
slop free. - now back to the workshop...... |
|
(29/01/12) |
|
 Solange
now finished Gear installed (but not yet flown) and workshop
tidied. Solange
now finished Gear installed (but not yet flown) and workshop
tidied.
The replacement indoor Shockie
model not complete yet but it wont take long.
I have been tweaking a few of
the fuselage former drawing on the CAD programme in
readiness for making the Genesis fuselage plug. |
|
(02/Feb/12) |
 Indoor
shockie now finished and lots of photos to support an
article on how to build a shockie - article to come soon. Indoor
shockie now finished and lots of photos to support an
article on how to build a shockie - article to come soon. |
And So it Begins.....
|
02/Feb/12 |
 - In the
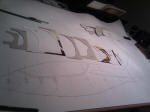
Beginning......... I've Started by making a tracing
of the fuselage profile from the original drawing, and
produce some fuselage former templates and stuck these on to
old cornflake boxes. These will allow me to accurately
fabricate the fuselage plug. Preparation is the key. then I
can start to cut wood in earnest. I will keep you up to date
and the project progresses.
- In the
Beginning......... I've Started by making a tracing
of the fuselage profile from the original drawing, and
produce some fuselage former templates and stuck these on to
old cornflake boxes. These will allow me to accurately
fabricate the fuselage plug. Preparation is the key. then I
can start to cut wood in earnest. I will keep you up to date
and the project progresses. |
|
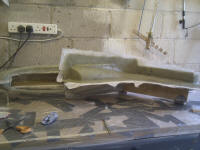
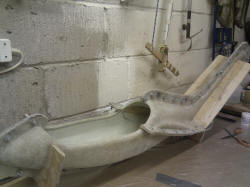
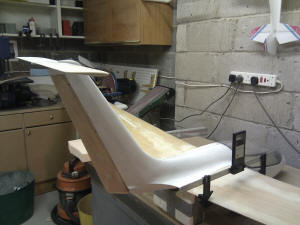
05/Feb/12 |
 Given the current bad weather, sleet, snow and fog, it just
isn't the weather to go flying, which has allowed my to
concentrate on progressing the Genesis. The assembly of the
fuselage Plug is now well under way. A new bandsaw blade
made easy work of the MDF cutting a total of 10 profiles,
now laminated together with resin. The boring bit is I've
now got to wait until this is set before I can start to
carve and sand my creation. Currently the MDF fuselage
structure is under an electric Blanket keeping warm to help
the epoxy resin set. However, Indoor flying tomorrow, so I
will not be tempted to take the clamps off early and make a
mess of it all.
Given the current bad weather, sleet, snow and fog, it just
isn't the weather to go flying, which has allowed my to
concentrate on progressing the Genesis. The assembly of the
fuselage Plug is now well under way. A new bandsaw blade
made easy work of the MDF cutting a total of 10 profiles,
now laminated together with resin. The boring bit is I've
now got to wait until this is set before I can start to
carve and sand my creation. Currently the MDF fuselage
structure is under an electric Blanket keeping warm to help
the epoxy resin set. However, Indoor flying tomorrow, so I
will not be tempted to take the clamps off early and make a
mess of it all.
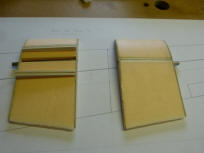
I was talking to my old
friend Neil - partner in crime for this project, and he is
currently drawing up the wing plan in readiness for cutting
the foam cores next week...... No pressure then! I have
included as promised, a photos of the progress.
|
|
14/Feb/11 |
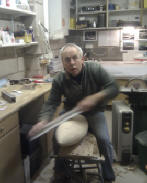
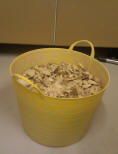 Wow,
I forgot just how much mess you can make with MDF. A
builders tub full of shavings and dust and still more to do
– what great fun. Don’t like having to clean up every half
hour or so though. Wow,
I forgot just how much mess you can make with MDF. A
builders tub full of shavings and dust and still more to do
– what great fun. Don’t like having to clean up every half
hour or so though.
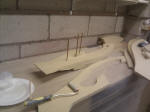
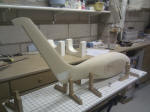
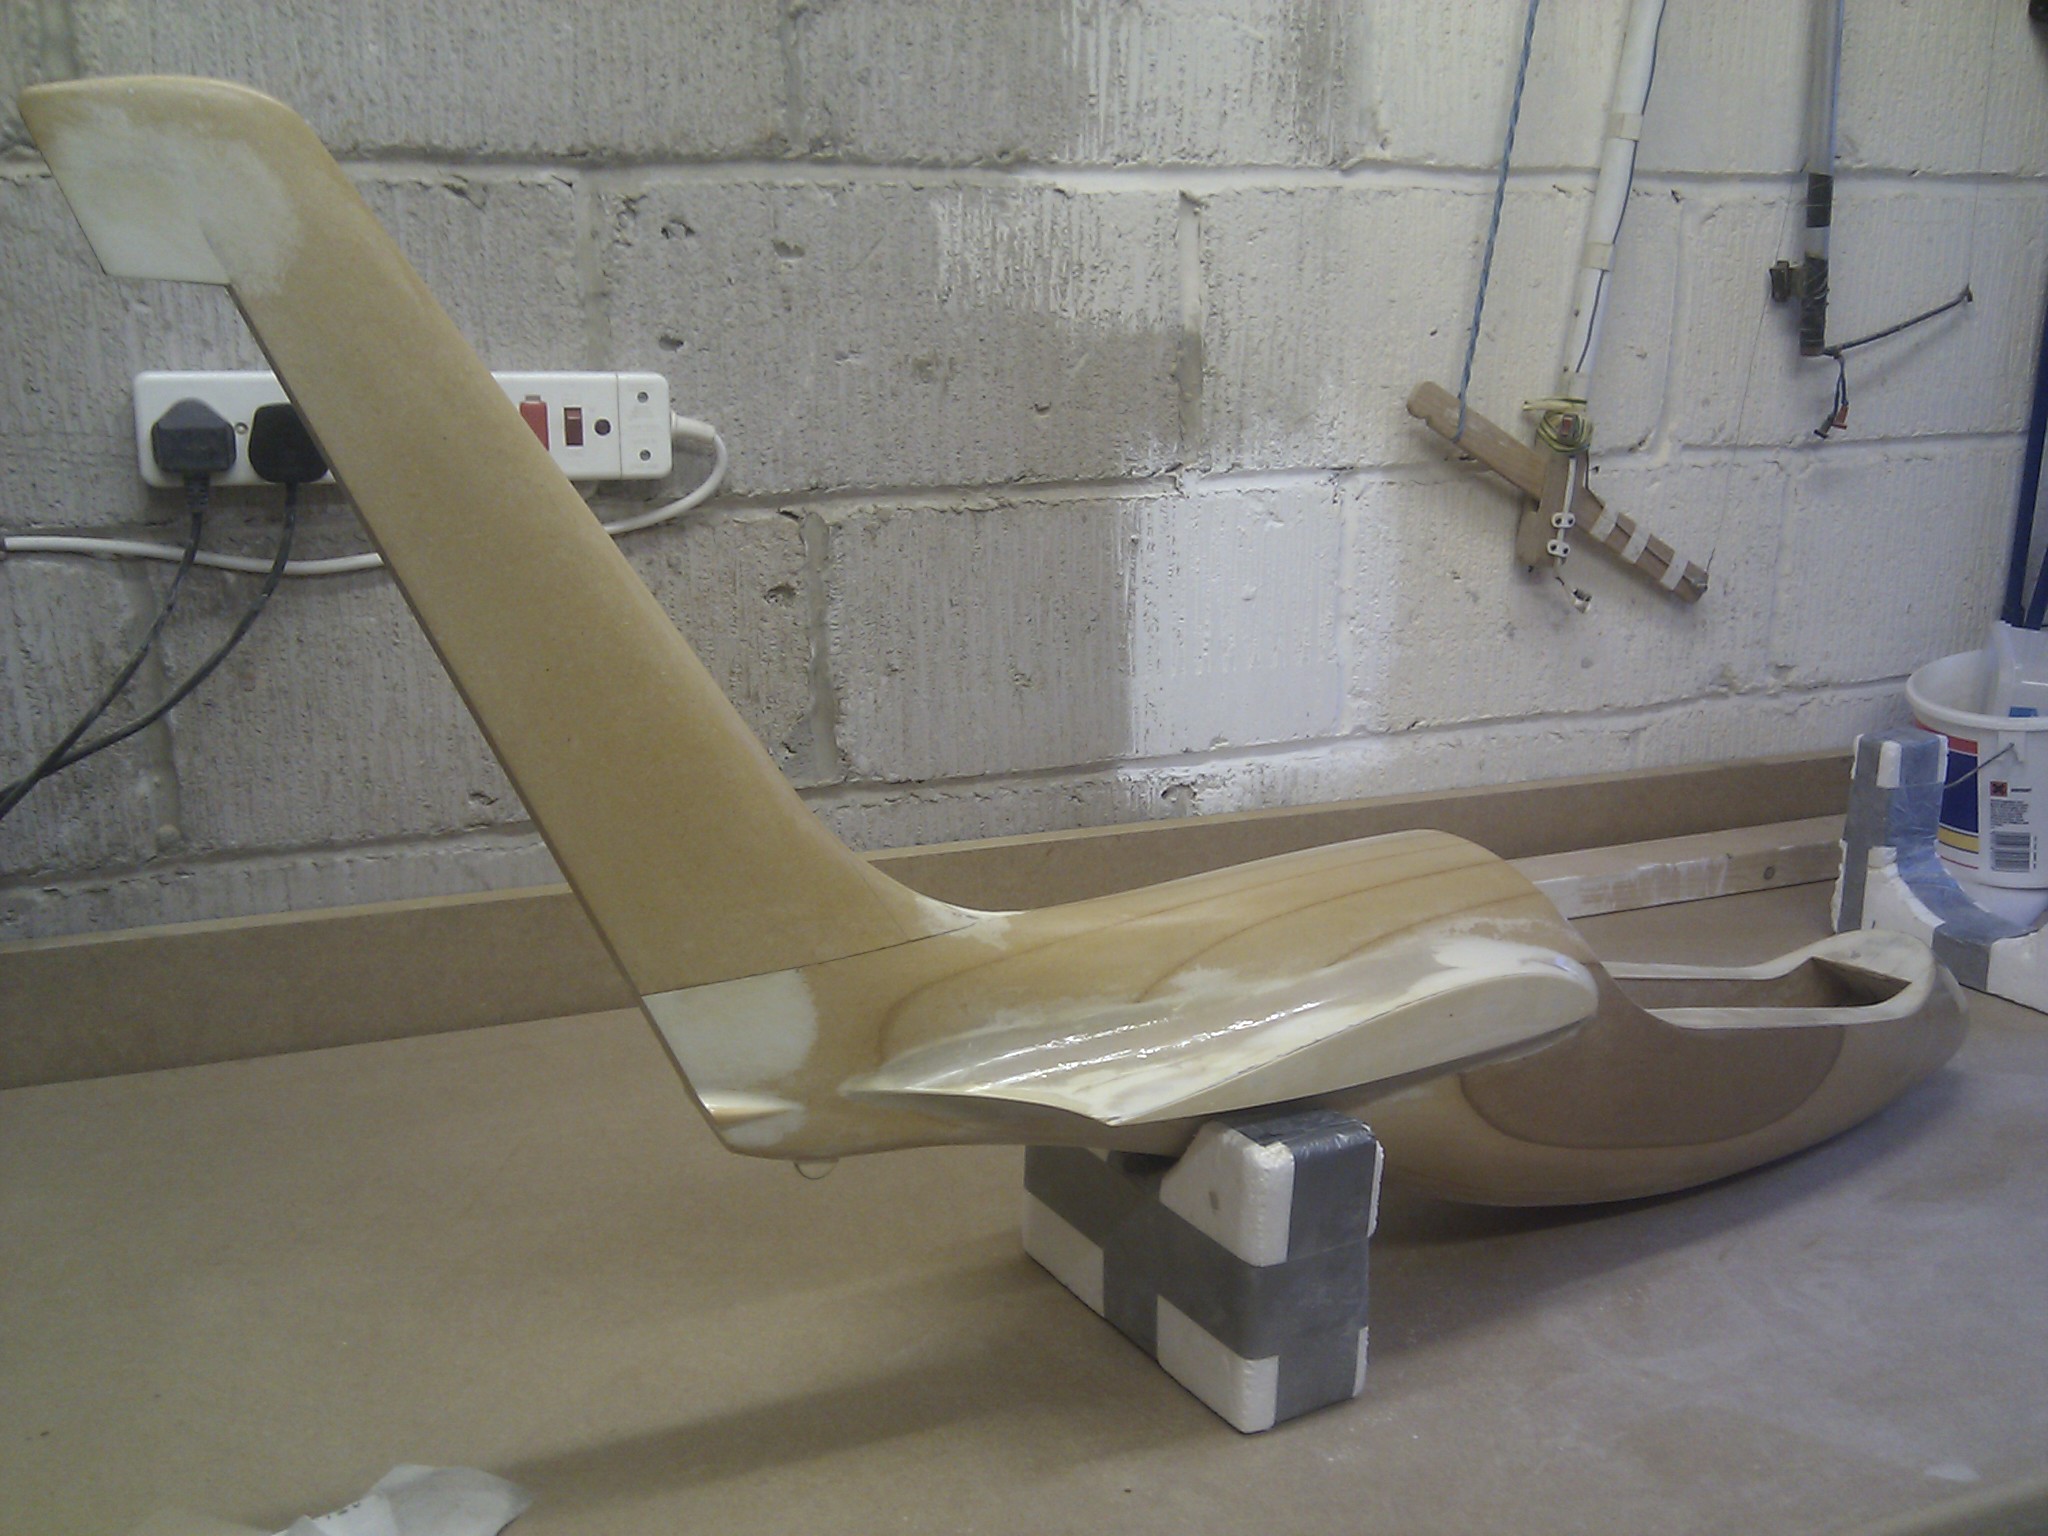
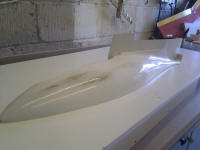
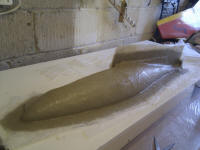
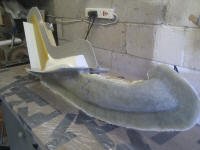
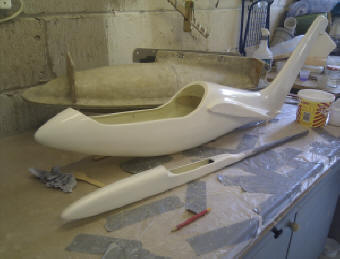
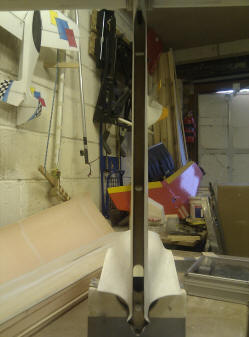
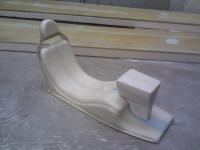
The Fuselage is finally taking on the sleek streamlined
form, however, I was caught in the act…… Oh, pleased to see
you dear………. I was actually sat on the fuselage plug which
was the only way I could hold the fuselage whilst cutting,
shaving and sanding it to remove the unwanted material to
finally achieve those curves, honest! I got a cup of tea
though. :-) and a promise to knock next time.
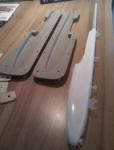
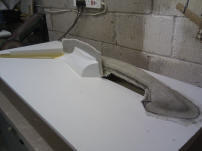
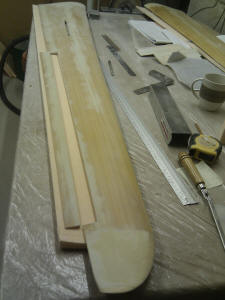
The fuselage is almost
there. Some final sanding and a little filler required.
Next I need to manufacture the fin and fit the wing seats
and blend these into the fuselage.
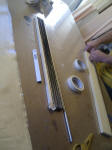
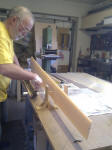
I’ve already made a start on the fin. One side almost done –
planed and sanded to the formers fastened to each end, the
fin so far has only taken me about 1.5 hours, got the other
side to do tomorrow.
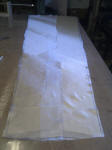
Also need to remove the canopy part of the plug and prepare
this to go to Neil so he can form the acetate canopy. To do
this I need to extend the surface area of the canopy plug
about 20mm all way round the canopy seat, then prepare the
surface finish as fine a finish as possible but with no
resin, paint or sealer so he can then work his magic.
I used sanding sealer on a previous project and got into
trouble as the vac forming machine melted the sealer – a bit
of a mess by all accounts – kept sticking to the ABS plastic
fuselage he was moulding for me at the time – lesson learnt!
News from Neil is that he was unable to get the wing cores
cut last week – I think work got in the way, but is planning
to get them sorted by the end of this week. I will hopefully
get some photo of the wing cores when they are done.
Time to clean up the mess once more.
15/Feb/12 Update on the
Wings: Neil has cut 1 full set and some of the panels for
the second set before he ran out of foam. Photos to follow
soon.
|
|
|

|
|
 |
|
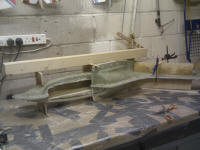
19/Feb/12 |
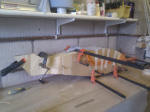
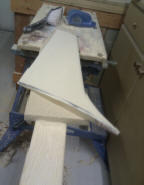
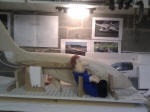
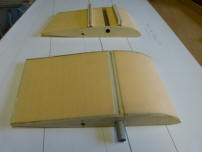
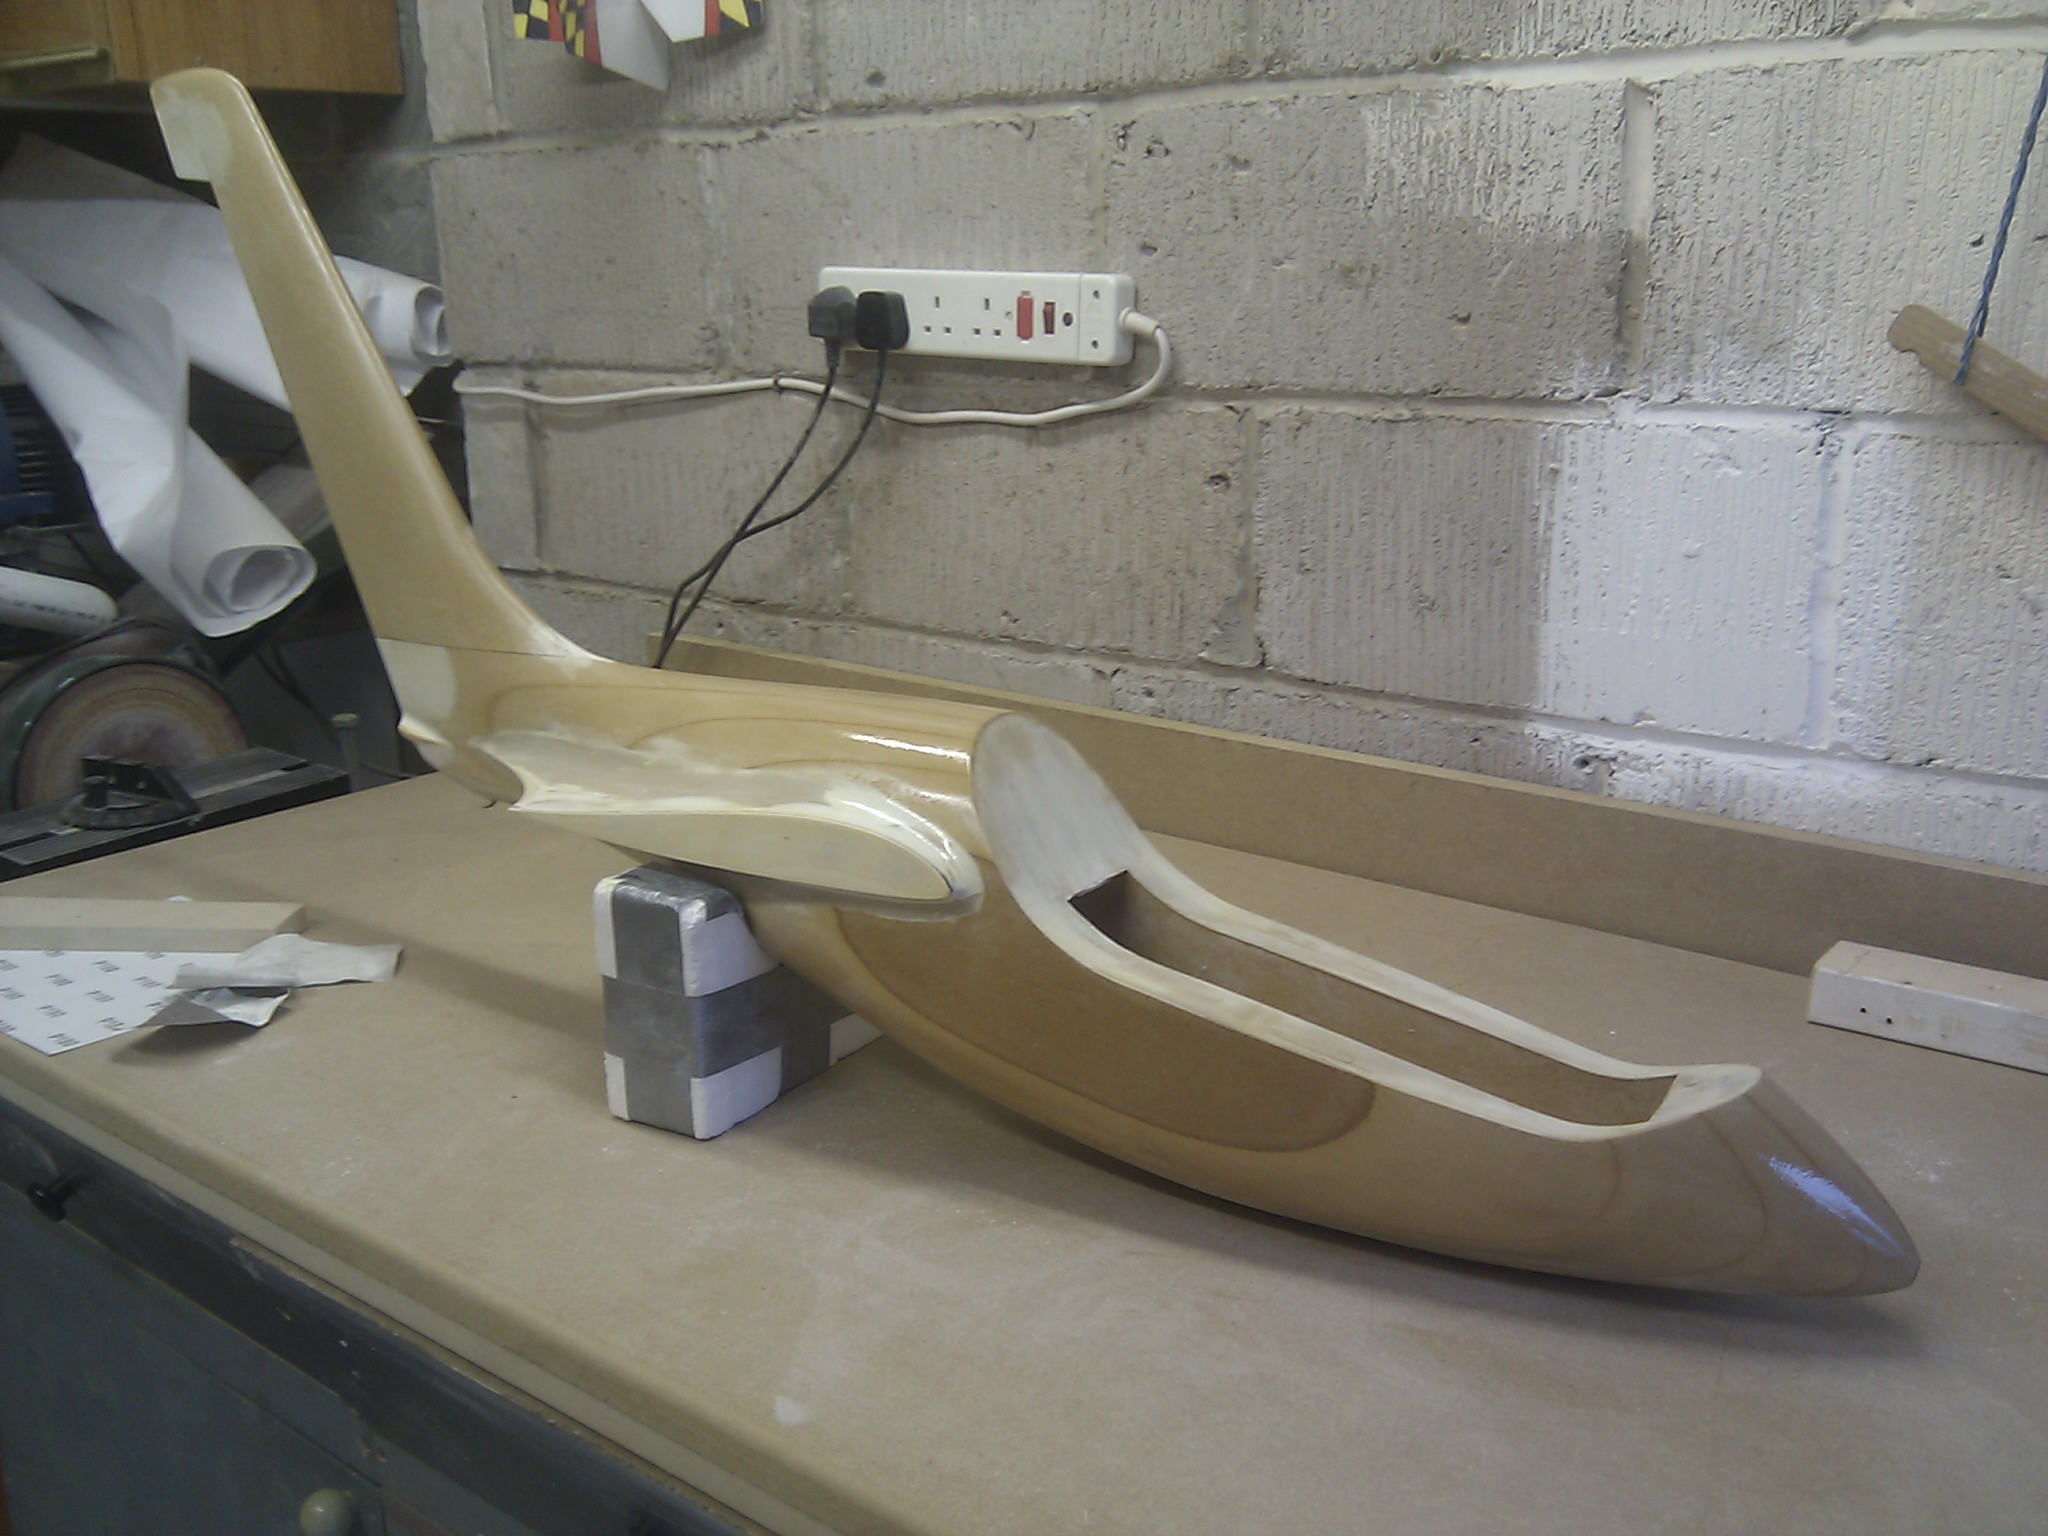
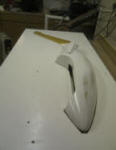
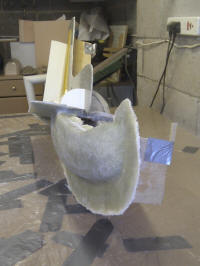
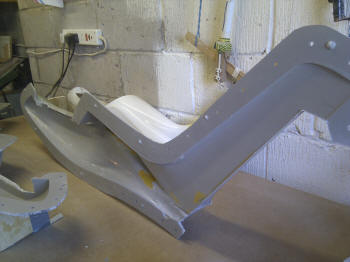
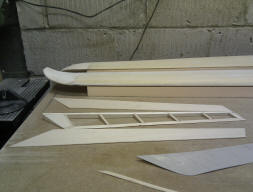
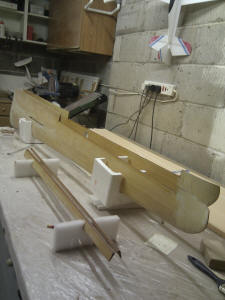
| The plug is definitely
taking shape; the fin is now roughly to shape and has been
attached to the fuselage. a little more fine sanding
required to get this sorted properly. The wing seat has also
been cut and offered up to the fuselage. its not fixed on
permanently yet, as this needs more work before gluing, then
fairing into the fuselage with epoxy filler.
I've had the day off from
creating dust today, however, on a day out with my good
lady, we found ourselves walking
 past yet another charity shop where I'm always on the
lookout for a good pilot. Julie looked up and saw the next
member of the club with a big grin on his face looking down
from the upstairs window of the Help the Aged Charity shop
in Buxton, Derbyshire , was a smiling Postman Pat. A little
humour and tradition of the ninety nine acre wood gliding
club (NNAWGC)...(I know Pooh's gang is from the hundred acre
wood, but we must be a wood short of a full one)......First
it was Eeyore now a fully fledged pilot in the Pilatus B4,
Goofy for the paraglider, now its the turn of Postman Pat-
just the right size for the Genesis, maybe?
past yet another charity shop where I'm always on the
lookout for a good pilot. Julie looked up and saw the next
member of the club with a big grin on his face looking down
from the upstairs window of the Help the Aged Charity shop
in Buxton, Derbyshire , was a smiling Postman Pat. A little
humour and tradition of the ninety nine acre wood gliding
club (NNAWGC)...(I know Pooh's gang is from the hundred acre
wood, but we must be a wood short of a full one)......First
it was Eeyore now a fully fledged pilot in the Pilatus B4,
Goofy for the paraglider, now its the turn of Postman Pat-
just the right size for the Genesis, maybe?
I've another indoor session
coming up tomorrow evening so another evening off from
cutting fixing and sticking.  However, some work to do in the evenings during this week to
hopefully get the wing seats sorted as the weekend is to get
the new wings assembled and skinned.
However, some work to do in the evenings during this week to
hopefully get the wing seats sorted as the weekend is to get
the new wings assembled and skinned.
|
| Genesis gets wings....
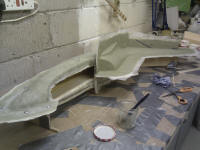
Work has continued on the
fuselage plug, now glued the wing seats in place and done a
little more sanding, but not as much progress as I would
have liked - had a few days off to catch up with other
things. However, on Friday I packed the car with vac bagging
equipment, a few blocks of foam, and of course, a few models
both slope and indoor, just in case.......... and set of on
the 3 hour journey with my very understanding partner to the
slope soaring Mecca of England......... Lincolnshire. No not
really the slope soaring Mecca, there is only one hill and
that's got a Cathedral on top; Lincolnshire is particularly
flat. The main purpose of our weekend away was to get the
Genesis wing panels assembled and veneered. Neil and Sue's
hospitality is second to non, and on arrival a good glass of
beer and a lengthy catch-up chat, I think you can guess the
subject, at least between Neil and I. Our two partners, had
other things to chat about, being interested in mostly the
same type of things as each other.
Saturday morning and the
two girlies were up and out for some retail therapy leaving
Neil and I to attack the foam in the workshop. The wing
panels had already been cut and to my surprise, Neil had
already put in the shear web part of the main spar and also
installed the tubes for the wing joiners - Excellent job. So
all that was left was to lay out the glass cloth and wet out
the carbon.
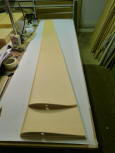
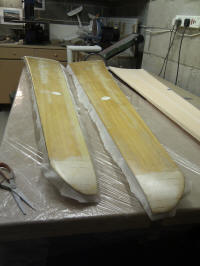
The covering for the wing
comprise of Obechi veneer a layer of glass cloth cut on the
bias at 45 degrees between the foam and veneer and carbon
tows wet with epoxy and laid into the rebate on the wings
above and below the vertical shear web spar. Carbon
reinforcement over the wing tubes, all sandwich together and
vac bagged.
Having got one wing sorted
in a couple of hours, what was left for the day was to get
some fresh air. A well earned brew and a quick bite of lunch
and we packed the car to venture across the border into
Leicestershire - just an hours drive away to check out
Burrough hill, about 5 mile south of Melton Mowbray. The
wind was a Westerly, with an element of north from time to
time. Needless to say, we had a good few hours of Weasel and
Wannabee fun - two brilliant foam models. just right for the
chosen slope. Coffee and Crimbles' and then home for an
evening out.
Sunday morning saw us
rushing to check out our handy work from the day before; a
freshly bagged Wing. Back inside for Cereals, Croissants and
Coffee, then on with the gloves to sort the other wing.
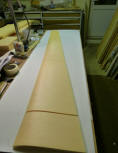
The second wing was
efficiently dealt with, having had a good run through the
process the previous day. Neil prepared the Carbon tows for
the leading edge whilst I arrange the veneer. We then worked
together to apply the carbon leading edge to the foam core.
I then prepared the carbon spar tows, while the glass cloth
was laid out and rolled with epoxy. The spars rebates were
filled with carbon and rolled out in next to no time and
everything sandwiched up again for the vac bag, again, all
before lunch. The girlies had gone off to some craft fair,
so what else could we do but have a spot of lunch, and go to
RAF Digby to make use of their fantastic gymnasium that is
situated inside a huge hangar. No one else around so out
with the shock fliers and a little indoor flying.
The day activities
precluded with dinner - as I said Neil and Sue are such good
hosts, followed by coffee and pudding. Then we packed the
car for the journey home to Lancashire. Having had a really
good weekend in more ways than one, we arrived back to the
Preston area to be met with rain; Oh, what a surprise.
The wings are still with
Neil, as he has offered to prep the wings further and cut
all the necessary holes for the servos, airbrakes etc.
Another trip will ensue soon to get the 2nd set of wings
sorted. Hopefully the pictures will give you the story so
far. |
 |
|
click on
images to see larger photo |
|
16/Mar/12 |
| News from the
workshop.......Neil has been busy. The build of the first
set of wing is done. They now need covering in glass cloth
and resin, the ailerons have to be cut out and the gear
installed. The second set of wing cores are now done, the
shear web and joiner tube are being worked this week, so I
will have to arrange a trip to get the second set of wings
in the vac bag and bring my wings back here for completion.
  The
canopy plug was taken to a secret workshop somewhere in
Norfolk............ and as expected, the first acetate
formed from it produced a few flaws in the plastic. However,
the plan was always to produce a really clear canopy so
aluminium powder and resin has now been poured into the
first moulding. When fully set this will be smoothed and
polished. This will form the new plug from which some
serious vac forming should take place. fingers crossed! The
canopy plug was taken to a secret workshop somewhere in
Norfolk............ and as expected, the first acetate
formed from it produced a few flaws in the plastic. However,
the plan was always to produce a really clear canopy so
aluminium powder and resin has now been poured into the
first moulding. When fully set this will be smoothed and
polished. This will form the new plug from which some
serious vac forming should take place. fingers crossed!
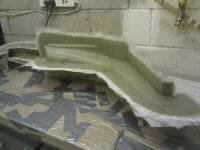
The fuselage plug is
getting lots of TLC. it has been coated in numerous layers
of sanding sealer and sanded back to quite a nice finish.
this is undergoing further work. It needs to be painted and
worked to get that shiny silky smooth finish required for
the mould. This will take a little time to get it to the
finish I require.
Whilst all this has been
going on, Neil and I have been getting out in the fresh air
up in the Lancashire hills. Yes, he popped in, as he was
just passing..... on the way back from a weeks holiday in
the Lakes. The weekend was blessed with fairly good weather,
a few showers on the Saturday, a little snow on Sunday, but
you have to make the most of the weather and good company. I
test flew my new Solange glider (see 24/1/12 on my blog)-
what a lovely smooth aerobat; It took me back to my powered
aeros days, flying a Ken Binks Adagio. The Solange is a nice
relaxing but very capable aerobatic machine. it wont be
hurried, it does everything at a constant speed, but does it
all with such Grace. If you fancy actually building
something and have a really nice machine to fly around and
at just £68 including Posting, its a bargain. see more on
the
cloud models website.
I'll Report on further
progress of Genesis soon....... :-) |
| |
|
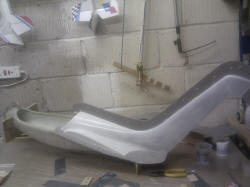
29/Mar/12 |
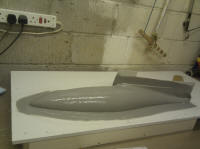
There's been
lots of fettling of the fuselage plug since I last updated
you on my progress. I coated the plug in a number of coats
of Filler Primer, cutting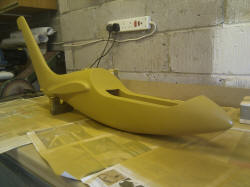 back each time. Once I was happy with that, I then gave the
whole plug a couple of coats of white primer. This then, as
expected showed up some imperfections in the finish. further
cutting back with 1000 grade wet and dry, followed by 2000
grade wet and dry. More paint, then cut back again. Finally,
using rubbing compound (T Cut) to get it to shine. Again
this revealed some slight pin holes. More paint, more
cutting back..............you get the idea!
back each time. Once I was happy with that, I then gave the
whole plug a couple of coats of white primer. This then, as
expected showed up some imperfections in the finish. further
cutting back with 1000 grade wet and dry, followed by 2000
grade wet and dry. More paint, then cut back again. Finally,
using rubbing compound (T Cut) to get it to shine. Again
this revealed some slight pin holes. More paint, more
cutting back..............you get the idea!
I have now got to the
polishing stage. Many coats of polishing wax to apply, buff
up and reapply. each time getting more and more high gloss
finish.
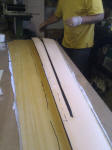
Whilst the photos show a
nice white colour, the actual model has a few patches of the
yellow showing through, this is where I've had to rub back
to remove other imperfections. But this has now resulted in
a very smooth finish. I don't think I will be applying any
more paint. Hope not anyway, As I am adding a few coats of
wax each night now.
I have also cut out the
frame in which to mount the plug ready for the next stage of
making the mould. I reckon the moulding stage is only couple
of weeks away, so watch this space.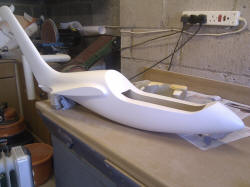 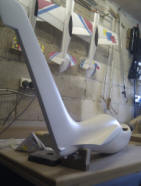
Update on the Wings........
I have been summoned to
Lincolnshire to help with the second set of Genesis Wings,
much like before. But I will be bringing my own wings back
with me this time. This will be the first time the plug and
wings have been together. So I hope to take a few photos to
whet the appetite so to speak, before I make the mould. In
the mean time I'll keep polishing.
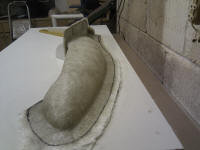
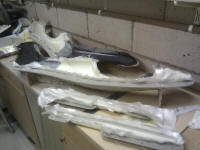
However, in between coats
of paint / rubbing compound/ polish I have moulded up
another Dude fuselage for a friend. (see My article on the
dude ds from the club news menu). Its had time to cure and
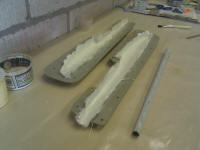
has now been popped out of the mould. got to remove the
swarf from the seams then I can deliver it. The reason for
showing the dude mould photos is to give you some idea of
what I need to make next. The two clamshell - like items in
the photos below are the moulds. the Genesis Plug will allow
me to make these, but I will probably be making the genesis
mould a 4 piece mould. All will be revealed why, later.
 See you soon.
|
|
11/Apr/12 |
|
A recent holiday up to
Scotland has meant that work on the Genesis stopped for a
week or so. Although I took a couple of models on holiday,
always keen to get some stick time, I didn't get to flying
them as the weather got the better of us; Edinburgh castle
was in cloud for most of the week, rain, snow, then a lack
of wind making sure that the models stayed in the car.
On our return home, a quick stop over, and then off to
Lincolnshire to help Neil with the other set of Genesis
Wings. These were laid up with the required carbon and cloth
and vac bagged last weekend. We also took the time to
prepare and vac bag the new glider tug wings, this will be a
bit of a beast powered by a 45cc petrol engine. The wing
cores are 3” thick and 1.6Kg each…Its Big! Possibly more on
this project later.
The Genesis Fuselage plug has had a few more touch-up coats
of filler primer to the fin, but it has now been polished
and has been laid in the mount in preparation for making the
mould. I am in the process of filling the gaps around the
plug with plasticine to complete the process.
I have decided to make the mould in 4 pieces because of the
fine trailing edge to the wing seat. If I made the mould in
two halves, I think I may have problems extracting the model
out of the mould. Therefore, for the purpose of removing the
fuselage, and plug for that matter, I will be making each
side of the mould also split along the wing chord line. More
work, but it should ensure that the model can be extracted
from the mould intact
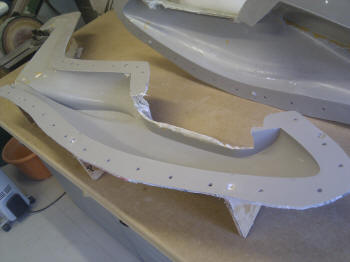
12/Apr/12
Last night I finished the
plasticine work and installed the flange that will help form
the join of the mould along the chord line (photo 2). A
little more therapeutic polishing is required and a coat of
PVA release agent and I will be ready to start the moulding
process.
I took delivery of some new Gel coat (decorative surface
finish) yesterday as I wasn’t sure if my old stock was still
any good. I hope to apply the Gel coat, followed by numerous
layers of chopped strand fibreglass matting of various
grades this coming weekend.
It gonna get messy!!!
13/Apr/12
Finally finished polishing, at
least for now anyway. A coat of PVA release agent was
applied
last night. This evening has been fun...... getting a little
messy with the gel-coat which is now curing. (that's the
grey paint like effect in the photo 3). The Gel-coat
provides a really nice base and decorative finish that can
be polished. This will be the surface you will see on the
inside of the mould.
1st thing tomorrow, its
back to the workshop and make a start of applying the layers
of glass matting and resin to build up the mould. The glass
matting of various grades has been cut to size for each
quadrant of the mould and is stacked neatly to one side in
readiness.
CW
    |
|
16/Apr/12 |
   Work
on the first part of the mould is now complete. Multiple
layers of various grades of fibreglass tissue and chopped
strand mat which were built up over the last two days, a
couple of layers at a time, a couple of hours between each
few layers to ensure the resin didn't go Exothermic.
Wouldn't want everything getting too hot! The last of the
layers went on last night, and then tidied up and cleaned
everything. Resin and glass fibre gets everywhere! Work
on the first part of the mould is now complete. Multiple
layers of various grades of fibreglass tissue and chopped
strand mat which were built up over the last two days, a
couple of layers at a time, a couple of hours between each
few layers to ensure the resin didn't go Exothermic.
Wouldn't want everything getting too hot! The last of the
layers went on last night, and then tidied up and cleaned
everything. Resin and glass fibre gets everywhere!
I resisted touching mould this
morning, instead the weather was good, and the wind was on
Jeffery Hill, the sun was even shining so I went to get some
stick time. Took the Smart, Solange and even the scale
Pilatus B4. I flew everything, so definitely a good day!
On my return and after the
weekend chores, cut the grass, clean the cars...... you know
how it is, I was back in the workshop to check on my handy
work and to prep for the next stage. This involved trimming
the lose glass around the edged and removed the plastic
flange along the wing chord - I was surprised how easy this
actually came off - obviously the right amount of polish and
release agent. I have now made some indents in the flange as
a key for part 2 of the mould and cleaned everything up. Its
now had a couple of coats of wax polish and I have just
sprayed it with PVA release agent in readiness for laying up
the next bit.
A day off tomorrow, as I'm
going indoor flying. See you soon. |
|
19/Apr/12 |
Not quite a
day off from the workshop on Monday evening. Yes I went to
the indoor session as usual and had a good time, although I
did feel that I was being singled out for target practise,
me physically……… I just seemed to be always in the way!
Anyway, on my return home, I quickly put everything away and
made my excuses to venture into the workshop to apply the
gel-coat to the plug in readiness for laying up on Tuesday
evening. Early away from work Tuesday and applied few layers
of glass tissue before dinner. Thereafter, I applied three
more layers of 100g chopped strand mat, which went on really
well. Again, it took a while to clean up to make sure my
tools would not seize up with resin and also to get rid of
any waste. I do like to jump straight in to the next phase
each day rather than having to clean up from the day before
of have to undertake work in a messy workshop.
Tonight its back in the workshop to finish off the 2nd part
of the mould with additional layers of glass up to the
required thickness. Then I can take a breather until the
resin has properly cured. By the weekend I will be able to
release the plug and moulding from the mount turn upside
down to expose the right hand side and repeat the process
for Parts 3 and 4 using the new moulded flange as the mating
surface.
Back to top |
|
20/Apr/12 |
| I can finally
stop holding my breath, as all is well!
Today I finished off the
supports to the outside of the mould so it will stand up on
its own on the bench, and once cured, I removed the mounting
board support that the whole assembly had been resting on
for the last week or so and some of the plasticine from the
underside. Turned the whole thing over and with the minimum
of pressure, the mould came away from the mounting board
clean. (start breathing again........)
A little trimming required
and a good polish and I can start to prep the 3rd part of
the mould. Basically, a repeat of what I have just done, but
using the flange on the LH mould to form against. Again, Its
going to be a busy and messy weekend ahead.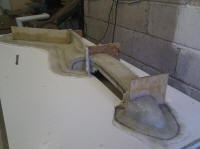 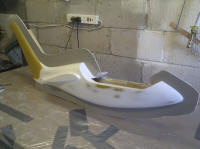 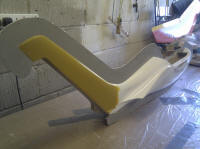 
|
|
23/Apr/12 |
| Having
completed the LH side of the mould I realised that I was
running low on resin, I certainly didn't have enough to
complete the RH side and therefore Thursday saw me putting
an order in over the internet for some more. This gave me an
excuse to take Friday off work to await its delivery. This
also gave me plenty of time to progress with the 3rd part of
the mould. Thursday evening saw a me spray a coat of PVA
release agent on to the lower RH part of the Plug, and
before retiring for the evening I applied a coat of
Gel-coat.
Friday morning was a
leisurely affair, I had a few task to do with the website,
but by around 8:30 these had been done, including uploading
a number of articles for the club news. By 09:00 my new
order of resin had arrived, what great service! I laid up a
few layers of tissue and let it cure onto the gel coat.
After lunch and in to late afternoon more layers of fine
chopped strand mat, were applied. The next day, Saturday, I
awoke early and couldn't get back to sleep, the morning
chorus of bird songs were just too much! So an early
Breakfast and into the workshop with my mug of Tea to apply
a few more layers to the mould.
My good lady also awoke
earlier than normal due to the smell of resin permeating
into the house....Oops...... Anyway, doors shut and window
open sorted that out. By this time, I had finished the first
few layers and so after coffee and toast we ventured into
town earlier than planned. After a leisurely trip around the
shops which was not complete until I had visited the model
shop, we stopped in at the local garden nursery for a quick
look around and a spot of lunch, after which, it was back
home and changed for the final session on part 3 and applied
the last of the layers of course chopped strand mat.

Its now Tuesday evening and
the plug and mould is ready for part 4 to be fabricated. It
has been polished, had the pva release agent applied and a
coat of gel coat. This will cure overnight allowing me to
start laying up the final part of the mould tomorrow
evening.
The word from Neil down in
Lincolnshire, is that both sets of Genesis wings are sorted.
This means that they have been trimmed, sanded and the
recess for Servos and Airbrakes have bee routed out. I just
need to finish the fuselage mould, create a fuselage and
then we can meet up to do a swap, a fuselage for a set of
wings - I reckon that's a good swap. He has also finished
polishing the new plug for the canopy and he informs me that
he hopes to vac form the canopies tomorrow.
That's it for now. I will
be busy again tomorrow and I will report back when the mould
is complete. Hopefully by the weekend, I will be ably to
split the mould and extract the plug. A time of excitement
and apprehension. watch this space! |
|
27/Apr/12 |
| Friday evening
and the job is done!!!!!!!
Final two layers of course
glass fibre has been applied to the mould. It has been
trimmed to shape and the wooden ribs have been cut and
glassed in place so that each half of the mould will stand
steady on the bench. These have been weighted down and are
now curing.
More trimming to do
tomorrow and then probably tomorrow evening or Sunday, I
will be able to split the mould into its component parts and
extract the fuselage plug. We will see just how much work is
left once this has been done. I will of course, let you
know.
 |
|
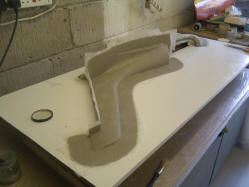
A Fuselage Mould is Created
!!!!! |
Saturday
morning 28/Apr/12 ,and everything was nicely cured, but
so I didn't attack the mould too early, I ventured out into
town with my good lady to get supplies. However, on our
return and after a spot of lunch, I was just itching (from
all the GRP glass dust), well that as well, itching to see
if the mould and fuselage plug were able to part company.
Having trimmed off the excess glass from around the joins I
set to carefully inserting wedges of wood into the join to
separate the four individual moulds from the plug. The
first part let go very easily. and so did the second part.
That was one full side away from the plug, nice and clean
too. The second half was a little more troublesome. The top
rear part of the mould of came off clean with a little warm
soapy water and little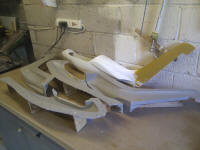 teasing, but the lower part was having non of it. More water
, a little trimming around the canopy line but still not
really giving. A few more wedges, and soapy water applied to
the gaps, and with my patience waning, a little more
force........... and the plug was free.
teasing, but the lower part was having non of it. More water
, a little trimming around the canopy line but still not
really giving. A few more wedges, and soapy water applied to
the gaps, and with my patience waning, a little more
force........... and the plug was free.
A little damage to the
plug's surface finish, but sometimes this is expected. The
plug is good around the belly, so another new mould to
fabricate the undercarriage doors is on the cards, and with
a little tidying up, I may also be able to fabricate a mould
for the canopy frame...... but they will be for another day.
I feel like all the effort
has been well worth it. The mould need some trimming and
cleaning up, and the inevitable polishing, but I am really
looking forward to this. For now I feel like a proud dad.
That's it for today though, I'm out tonight to celebrate!
:-)
|
|
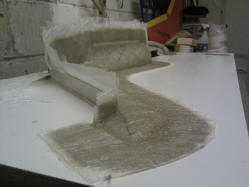
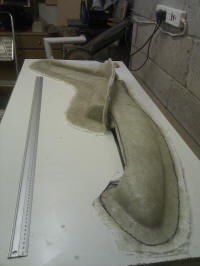
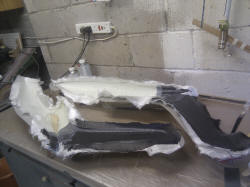
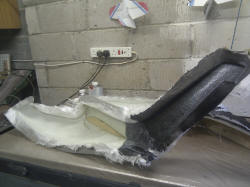
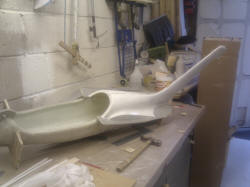
07/May/12 - The Layup |
| Unfortunately
the BAESMAC website has been off line due to a server
problem for a week, so I have not been able to keep you
abreast of my progress. However, I write in retrospect,
starting with last weekend 10 May, to present day......
Last weekend, over the bank
holiday, saw me cleaning up the mould and doing a lot of
polishing. A coating of PVA release agent to the four parts
of the mould on early Saturday morning. After lunch I
applied the Gel coat and then had to wait for this to go
"green", before I could start laying up the glass cloth into
the mould. I first started laying up the area of the
trailing edge fairings requiring to put in a layer of cloth,
then micro fibres before assembling the two quadrants of the
mould to make up each half.
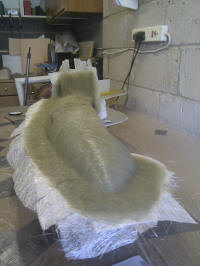
Then starting off with the
fine grade glass cloth I methodically progress wetting out
the cloth easing it into all the wing seat areas, again
using micro fibres and resin to fill in the small gap at the
trailing edge fillet. two layers of 160g cloth followed by a
300g layer to the main body and of course the Carbon cloth
in the fin - that's the black area you can see in the photo.
Having laid up both sides
of the fuselage I then had to wait for these to go "green"
so I could trim the excess cloth and resin to allow me to
join the two sides. The clock was ticking, it was already
8pm and I had not trimmed or joined the fuselage halves.
However, by around 10:30pm, maybe more like 11pm, the resin
had gone off enough to allow a sharp knife to cut through
the cloth and resin cleanly, just life a knife cutting
through firm butter. This is what I mean by going
"green"....
A strip of wetted out glass
cloth was then laid inside the fuselage on the join and the
whole thing bolted together.
 At
least this size of fuselage allowed bigger tools to be used
to fully wet out the joining cloth and make sure everything
was ok. 11:45pm and it was time to clean up. I was very glad
that the Job was finished, I was tired, it had been a very
long day, somewhat frustrated and how long it took to lay up
the cloth, but pleased with the overall outcome. At
least this size of fuselage allowed bigger tools to be used
to fully wet out the joining cloth and make sure everything
was ok. 11:45pm and it was time to clean up. I was very glad
that the Job was finished, I was tired, it had been a very
long day, somewhat frustrated and how long it took to lay up
the cloth, but pleased with the overall outcome.
I only ventured back in the
workshop the following morning to make sure that the resin
was curing properly and everything was ok. Then off for the
day up to the lakes with the missus and a well earned rest.
|
|
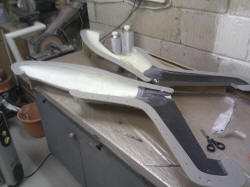
10 May 2012 - Genesis is Born |
| Moving on to
today, Thursday 10 May 12 and over the week, I have been
busying myself with working out how I might construct the
canopy frame, a few experiments later and I think I have
worked out the method. This is something to accomplish over
the coming weekend, and I will report on this in good time.
However having been eying up the fuselage still in the
mould..... I felt it was time.............
Having undone all the bolts
holding the mould pieces together, I started to methodically
insert wooden wedges into the joins to separate them. This
is a time of anxiety! It needs quite some force to be
applied and teasing to get the mould to give up its hold on
the content and the odd cracking sound makes you hold your
breath. Finally mould released bit by bit to reveal it
contents. The final part of the assembly is always the most
resistant to release. I reassembled everything around the
fuselage again, bolting it all together to get some leverage
on the final quadrant of the mould. It worked. A final loud
crack and the mould gave in to the tweaking. Everything
quickly unbolted and the component parts pealed away for
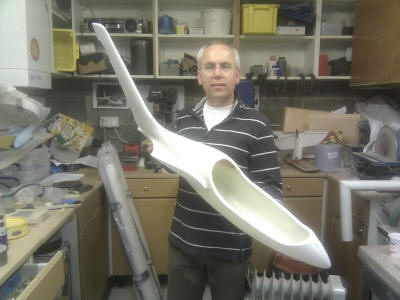
reveal a perfectly formed Genesis. Relief all round!!!!
Genesis is Born!!! Sweet!!.
and a healthy 900grams. I can finally breath again. here's
some photos of the big day.....
See you soon :-) |
|
21/May/12 |
|
 In
the last 10 days I have been experimenting with canopy
frames for the Genesis fuselage, also experimenting with a
cockpit moulding and of course, preparing the mould in
readiness for fuselage No 2. In
the last 10 days I have been experimenting with canopy
frames for the Genesis fuselage, also experimenting with a
cockpit moulding and of course, preparing the mould in
readiness for fuselage No 2.
I met up with
Neil at a Control Line event this weekend at Barton
Aerodrome near the Trafford Centre, Manchester. I found my
way to the modelling site which, without the help of a
modeller that I spotted with a hatchback full of Control
Line models I would never have found. Once at the site I met
up with Neil and another really good friend, Paul
Blakeborough who was the other part of the Control Line
double act. It was almost like a scene from the 'minder'
series, exchanging goods in the middle of nowhere, where no
one can see.....ere, what you got there then?????
No dodgy
dealings here though, and there were witnesses.
While I was
extracting the Genesis fuselage from the back of my car,
another aeromodeller, and who happened to be, a full size
glider pilot stopped and said...." oh, it's a Genesis".
Well, I was impressed, and I must have done something right
if someone can recognise the aircraft without its wings.
Anyway, I duly handed over the fus, canopy frame and cockpit
to Neil, and in return he handed me a set of wings, a joiner
and a couple of canopies. A good swap I reckon.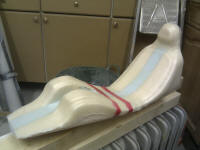 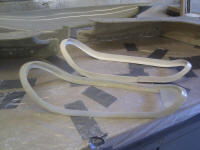
Back in the workshop I had already treated the fuselage
mould to a coating of release agent the day before, and late
Saturday evening I applied the gel coat. It was difficult to
get to sleep that evening, Have I mixed the gel coat
correctly, have I got all the glass cloth ready, Hope its
not another 14 hour marathon......... you get the idea.
The birds woke me early, we have a few friendly
chaffinches that like collecting bugs and other small
insects that gather around the window and door frames. and
they continually flap around and peck the windows....
Needless to say, I was up at 6 am Sunday morning, quick
breakfast and took a cup of tea into the workshop. By 9am I
had laid up the Genesis fuselage and also a Dude flying wing
fuselage. Excellent work! By 9.30 am I had cleaned up and
was enjoying coffee and toast.
  Later
in the afternoon, My daughter came around for a chat and a
favour, but I made the request first, she made me a nice cup
of tea as I had trimmed the glass cloth and was already
mixing resin to join the fuselage sides. A good chat a spare
pair of hands and good brew allowed the fuselage to be
assembled in good time. I left the Dude mould until later,
as this is more like micro surgery and it needs to be put
into a jig to align the carbon tail boom, all was completed
before dinner and a night off. Later
in the afternoon, My daughter came around for a chat and a
favour, but I made the request first, she made me a nice cup
of tea as I had trimmed the glass cloth and was already
mixing resin to join the fuselage sides. A good chat a spare
pair of hands and good brew allowed the fuselage to be
assembled in good time. I left the Dude mould until later,
as this is more like micro surgery and it needs to be put
into a jig to align the carbon tail boom, all was completed
before dinner and a night off.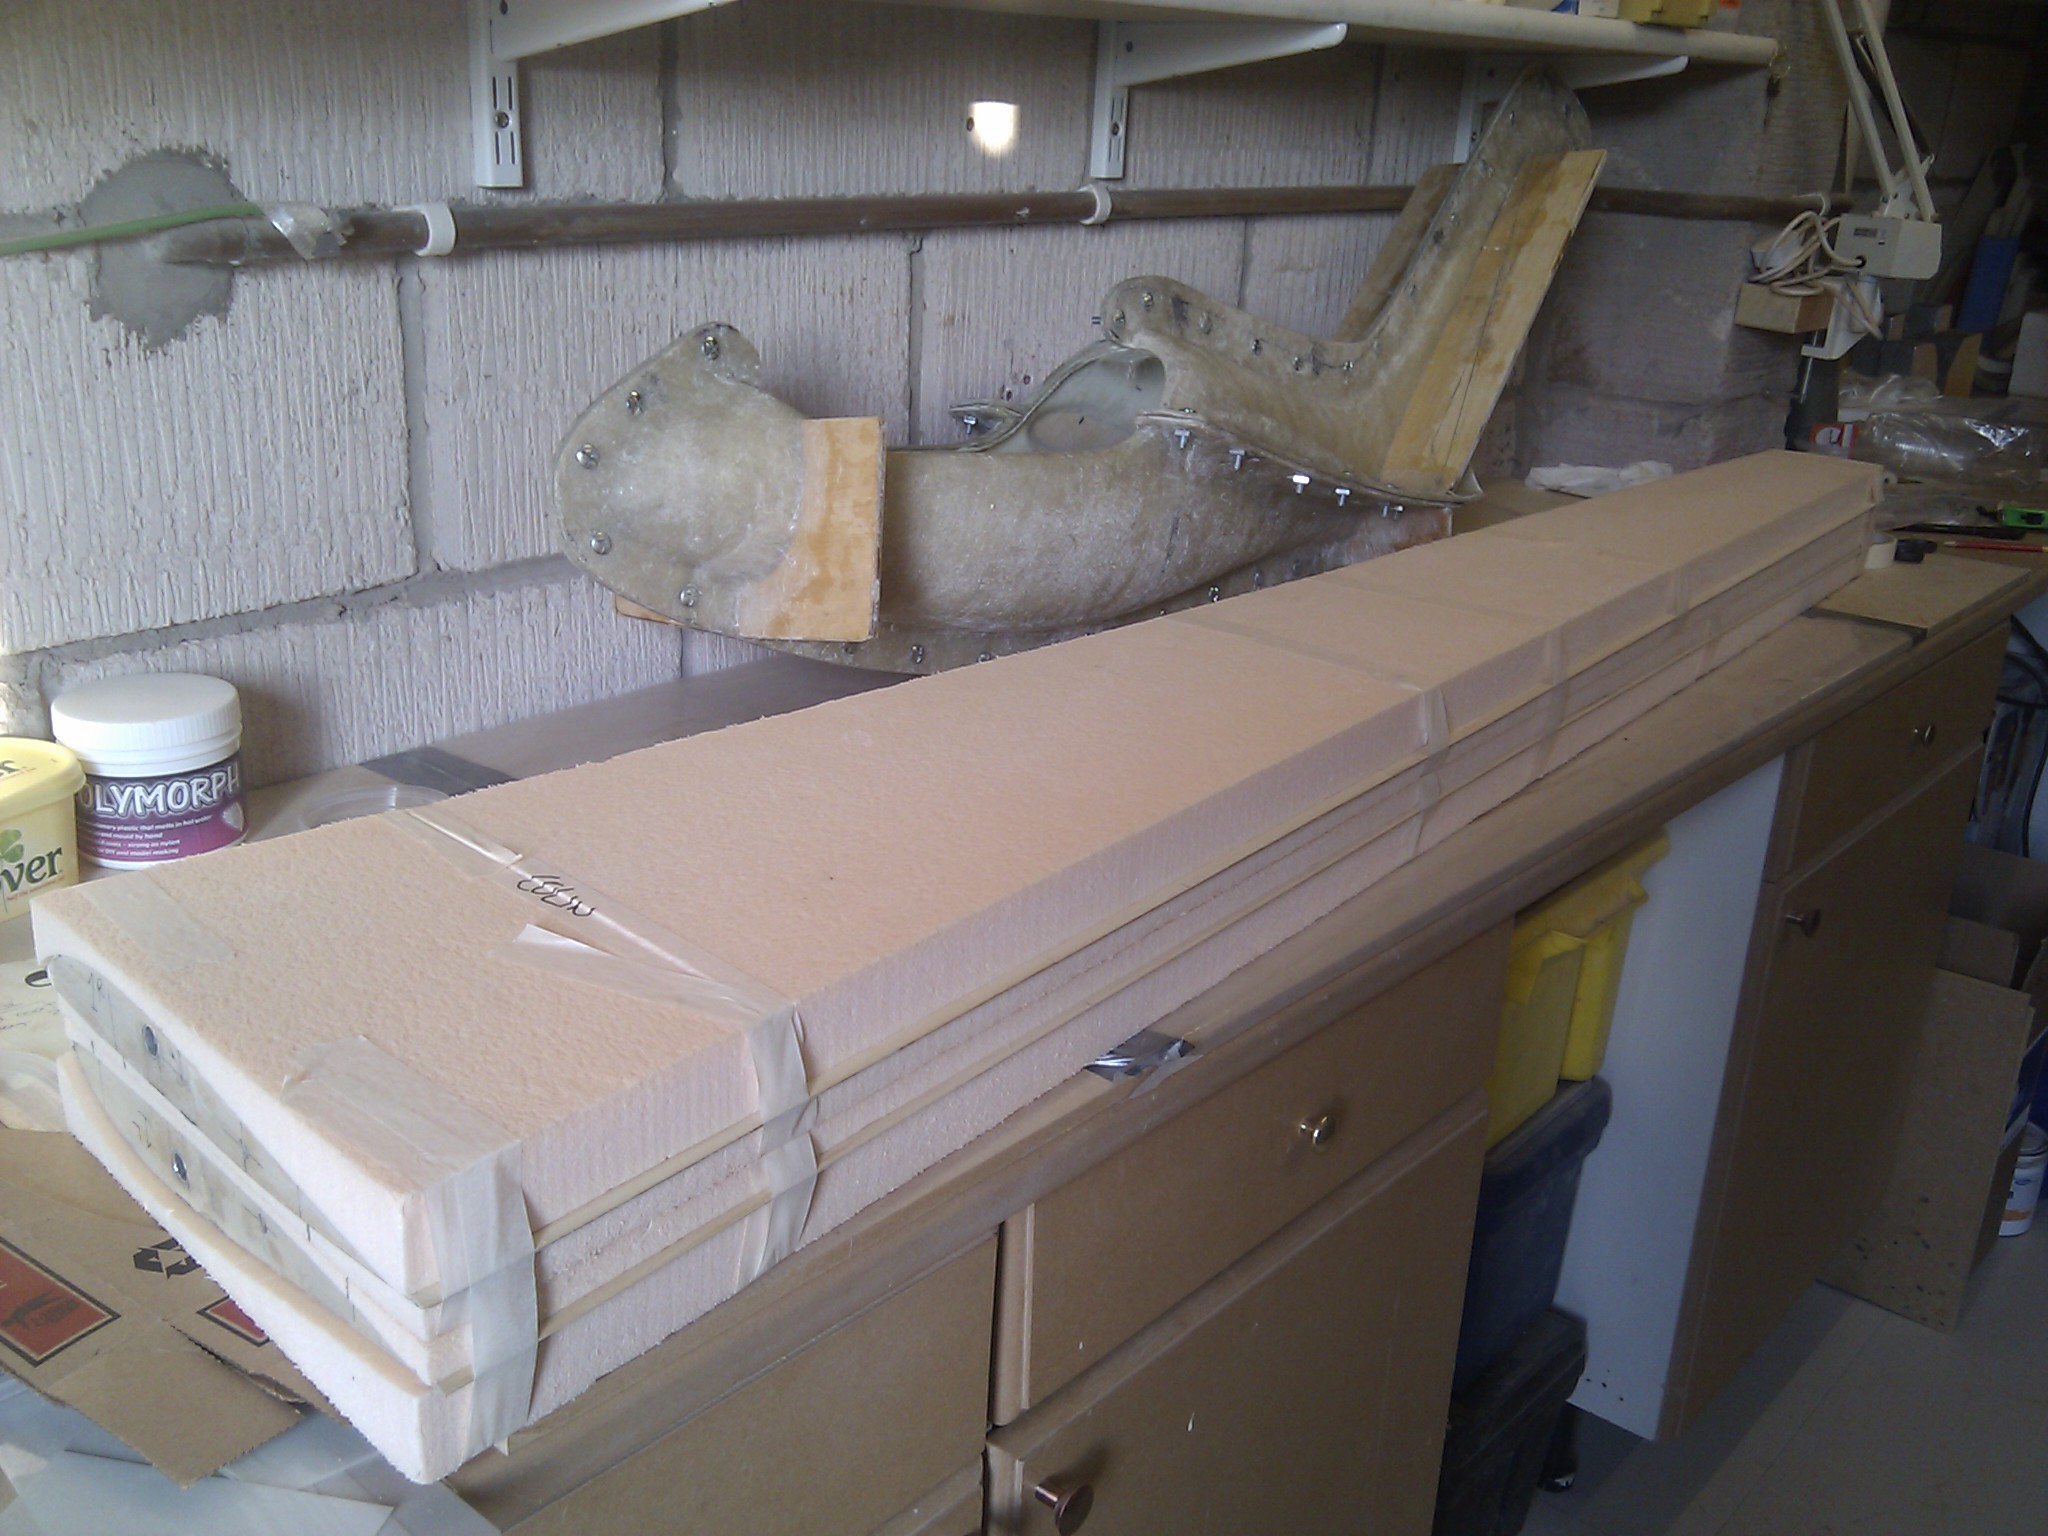
Both fuselages are now curing and although its now been
over 24 hours and all seems dry, I always like to leave
them for a good few days before I split the mould. Thursday
is the day! so watch this space. I hope that if the weather
is good, I can offer up the wings to the fuselage and take a
photo as a treat.. and to whet the appetite for the
remainder of the journey.
See you then.
|
|
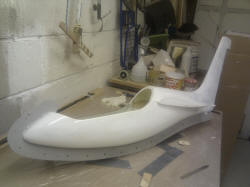
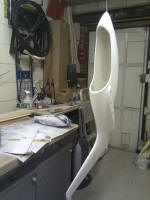
2nd Genesis
is Born |
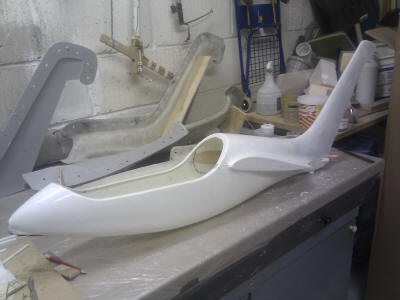
It's been an anxious week
waiting to see if the second Genesis fuselage would turn out
ok, having laid up and joined the fus at the weekend. Well,
I shouldn't have worried as Genesis 2 fuselage came out of
the mould fit and well at a healthy 850g. The mould released
its prize easily, the last part always being the most
difficult to release, but a little brute force did the
trick, and all this was before dinner.
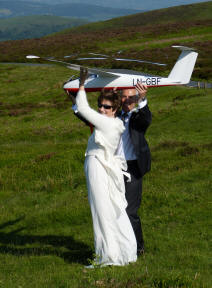
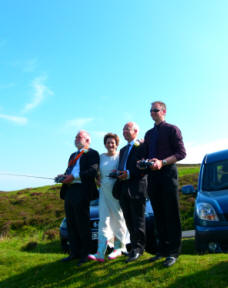
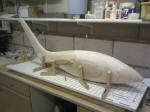
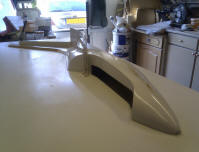
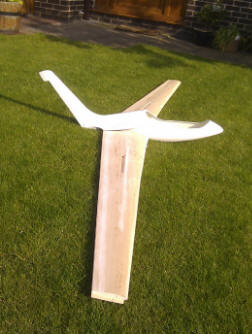
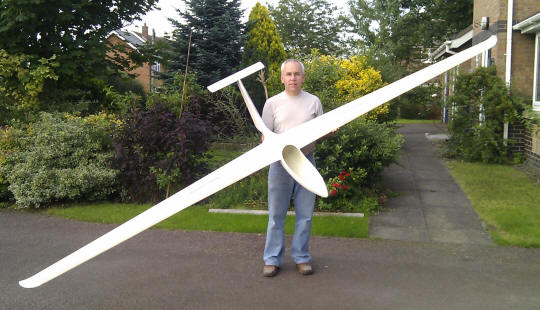
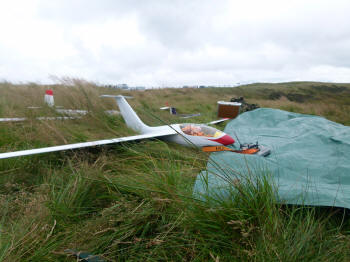
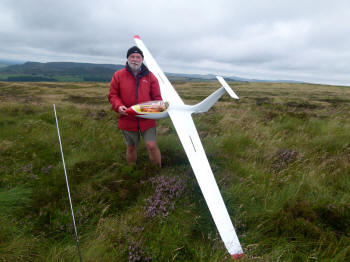
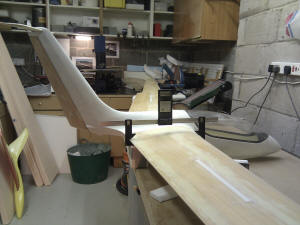
As I suggested the last
time I gave you an update, I decided to get the wings and
put them at the side of the fuselage to get a feel of the
actual size of this 1/4 scale project. As you can see from
the photos, its looking good, all 3.75m of it. Even the
NNAWGC (Ninety Nine Acre Wood Gliding Club) team are
drooling over it. See for yourself.
I now have a canopy frame
to make and the cockpit interior. then finish the wings and
fuselage and of course the Elevator which will sit at the
top of the fin.
Further updates to come as
it progresses further.

Back to top |
|
Genesis - the other one......
19 Jun 12 |
|
Apologies folks, but it has
been a while since I updated you on the progress of Genesis.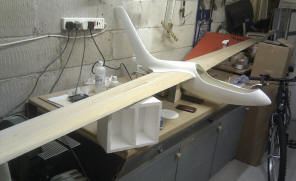
Things have progressed slowly
over the past week or so. I have been experimenting with
different canopy frames (moulded), which I have not been
totally happy with. However, canopy frames aside, I have now
married up the wings to the fuselage and this week, I need
to concentrate my efforts on finishing this off. I also need
to get the airbrakes installed in the wing and make the wing
tips. If all is well and I achieve what I have planned, I
hope to make the tailplane at the weekend, although I do
have plans to attend a flying event on Sunday, so this will
probably be a job for early next week.

Moreover,
my partner and I spent last weekend down in Lincolnshire
with Neil and his good lady. The main reason for the visit
was to attend a Royal Philharmonic Orchestra concert in the
grounds of a Stately Home on Saturday evening, there was
also to be a Spitfire flying aeros to the music – hence the
name of the event “Spitfire Proms”. The bad weather (Low
cloud, high winds and rain) grounded the BBMF spitfire, but
half way through the concert, despite the weather, we had an
aeros display from the "Blade" team in their Extra 330’s,
with just enough height below cloud base to perform their
normal routine. Lots of drift due to the gusting 30kts cross
wind, but a really excellent display!
The sea of umbrellas between us and the stage was also a
sight to behold. But the mix of good food (Picnic) good wine
and excellent music and a fishing shelter to hide in, made
for a memorable evenings entertainment.
Sunday
saw us in Neil’s workshop inspecting his handy work on his
Genesis model, which has been progressing well. The wings
are on, canopy frame made….. (I think I will be copying this
design), rudder post installed and glassed in with integral
servo mount and the tailplane has been made and has now been
mounted on the fin. All the things I need to do this week…..
I need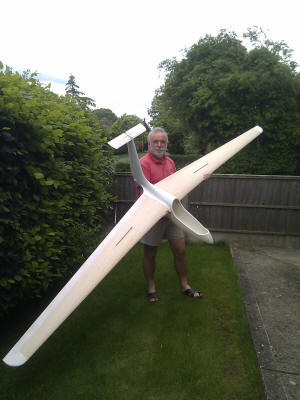 to catch up!
 It is hoped that we can get both our models test flown at
the end of July, which has always been the plan, and I think
that we are still on track to achieve this. It is hoped that we can get both our models test flown at
the end of July, which has always been the plan, and I think
that we are still on track to achieve this.
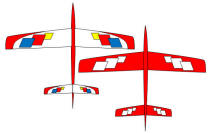
Photos of Neil’s Model
|
|
28 Jun 12 |
|
I met up with Neil on Sunday at
Leek and Moorland slope site in Staffordshire, for an
organised fun fly event, some 2 hours drive away. The
weather was a little wet to start with but got better albeit
a little blustery as the day progressed. We took part in the
fun competition, loops, rolls bunts, pylon race and whilst
most used foamy flying wings, Neil and I flew the "Dudes".
No we didn't win but we certainly created some interest in
flying something a little different. Once the competition
was out of the way, off the peg flying took part with lots
of mouldies taking to the air and again Neil and I both flew
the Dudes, better than in the comp and also aired our "Jart"
models such were the conditions.
News from the Lincolnshire is
that Neil's model is progressing well. All flying surfaces
have now been glassed in 49g cloth and epoxy resin. This
leaves me well behind, although I have made some progress.
The airbrake boxes have now been
installed, wingtips formed and stuck in place and the whole
wings sanded and some filler applied to get a better surface
finish. I note from the many photos out there of Genesis II,
that the aircraft has part of the wingtips angled upwards,
so I need to estimate how much and embody this detail. My
tail stabiliser has been made from balsa and I have been
working out the method of fixing this in place on the fin
and ensuring a suitable linkage - not quite finished this
yet.
Other jobs to do is make the
rudder , of course Neil has this already done and
glassed..... I need to install the tail servo mount and
rudder post, then create a suitable canopy frame. Doesn't
sound much but it all takes time to get right, not always
first time.
More updates to come
|
|
11 Jul 12 - The small things
seem to take the longest time to get sorted. |
|
My Genesis has been progressing,
albeit slower than I expected. The fitting of the tail plane
is now complete and I am happy with the control linkage that
I have fabricated. This is made from laminated fibre glass
board. Cut to shape and profiled to the tail. Unlike the
full size aircraft whose tail plane fits on from the rear, I
was having problems coming up with a suitable design that
would allow retention of the flying surface and to provide
the control movement required whilst having enough strength
to withstand the flying loads. Instead, I have opted for a
tail plane that plugs on from the side and the control
profile being sandwiched between the two halves, the join
being hidden by tape. The actuator mechanism will be
retained within the fin on removal of the tail plane.
The tail will be controlled by a servo mounted in the base
of the fin, and the mount for this has been installed. The
Rudder post was next to be made, this is in the form of
1/16" ply backed by 3/32" x grain balsa. The whole thing was
cut and sanded to shape and epoxy glassed in place with a
suitable gap for access to the elevator servo mount. Now
this is full cured, the whole fin is very strong with no
signs of any twist .
a number of areas required a
little filler and sanding and this is also complete. Tonight
it is assemble the model, make sure everything is ok and the
wings mate well on to the fuselage and then I can start to
Apply the glass cloth tomorrow.
An update from Lincolnshire,
Neil’s model is now fully covered in 49g glass cloth and
epoxy resin, due to some slight imperfections in the
fuselage moulding in the form of air bubbles in the Gel coat
(how embarrassing), this has had to be cut back with wet and
dry and the air bubbles filled - a little P45 car body
filler has done the trick. The problem was only over an area
of about 4 square inches, so not disastrous. He has also
been cutting out the ailerons and dressing the wing and
ailerons with epoxy and micro balloons. A text message last
Friday stated that the canopy and frame have now been fitted
to the fuselage. Another text message on Monday stated that
Neil has now started to paint his model.
The clock is ticking, but there is no point in rushing. It
will be ready when it is ready! More updates to follow.
A couple of days ago, I received
an email from a fellow modeller in Spain, Rafael Sanz who
found our website and my Genesis blog purely by chance.
However, the best thing here is that there is a whole
community out there, Rafael being one of them, that is in
the throws of building their own Genesis 2 models. Rafael's
website is quite informative and also provides some links to
other Genesis web pages. The website is in Spanish though.
However, If you put the following web address into google,
you can have the page translated for you.
http://tallerdedalo.es/web/Genesis-2D Technology, isn't
it fantastic!
Rafael's model is almost
complete which he started around the same time as me back in
January 2012. The model is a little smaller at 1.6m. Visit
the website via the google translate if you want the detail,
otherwise the photos will give you a flavour. Hopefully I
will get an update of how it flies is good time. Good luck
Rafael.
Well, It time to venture back in
the workshop for an hour. see you soon
|
 |
|
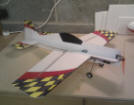
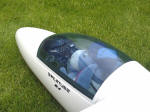
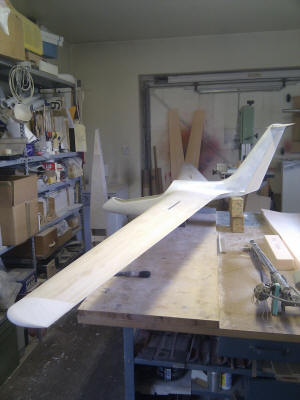
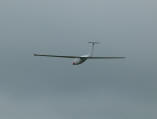
12 Jul 12
Here it is, Genesis in the flesh
so to speak..
I have now cut all the glass
cloth ready to finish the wings and tail plane and rudder
this weekend.
 |
|
16 Aug 12 |
Apologies for not updating my Genesis blog for some time.
To be honest, I think that the
amount of work that has been done to get the Genesis to this
point, burning the candle at both ends so to speak, I reckon
I must have over done it a little, and given the fact that
some of the more intricate jobs were not going so smoothly
at the time, I found myself getting distracted.
As I a keen cyclist, I
found myself distracted by the Tour de France, and the
Olympics. I have also produced a "Mistrale" kit (a swept
back version of the Dude flying wing) for Ron Ovenden. I
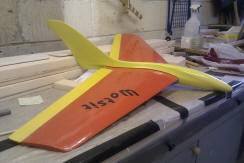
have put a few finishing touches to a new and much sexier
looking glass fuselage to an old design of mine - Wotsit
flying wing. (Named as such because everyone kept asking me
- what is it? - wot is it - wotsit)
All that and a few extra
hours at work prior to going on a flying Holiday last week
in South Wales (Awesome lift on Rhossili Down), I have done
very little to the Genesis since my last update. Phew, not
enough hours in the day - I can't sit and watch tv for too
long, especially when the day job requires me to sit at a
computer most of the time as well!!!!!! So here I am
batteries recharged and motivation on the up.
The Genesis wings and
flying surfaces are now covered in glass cloth and epoxy,
although there is a little extra work to do to the finish of
the wings as a few bubbles appeared under the glass cloth on
the top surface during the curing process. I have
subsequently rubbed the wings down and filled the holes. But
I now plan to put an extra thin layer (25g) cloth and epoxy
over this. I don't think the extra weight will be a problem.
Just last night I was
fettling a new cockpit interior for the Genesis in foam
ready for a layer of glass cloth and by doing so, renewed my
enthusiasm to complete the Genesis project.
This weekend should get me
even more fired up as Neil has finished his Genesis and I
plan to join him at the Leek and Moorland scale competition
this coming weekend to test fly, as well as enter our other
scale models.
As I mentioned earlier, I
went to Rhossili, near Swansea on the Gower peninsula in
South Wales last week and had a really good time. We rented
a cottage for a week just 2 miles from Rhossili. Both Neil
and I went flying whilst the girls went off and did girly
things........
If you can imagine a
400-500 ft 45 degree slope westerly facing range of hills
and a 15 mph wind, with nothing but sea and sand in front of
it - it just produced some of most smoothest lift I have
ever flown in. The lift stretched out so far even the
Quarter scale models were getting a little too far away for
comfort, but the lift was still good. I was flying the
Pilatus B4 around with such grace. Big sweeping turns,
loops, roll (well it is a scale model of an aerobatic
glider). Pretty impressive! On our first full day we flew
from around 10am until we watched the sun going down around
7:30pm. A wonderful day resulting in Flat batteries. as a
sun downer, it was back to the cottage for Tea and medals,
well, a nice cold beer really!
Yes, I will be going back!
We had a few days where the
wind direction was not blowing on to Rhossili Down, with
much lower wind speeds, but cliff top soaring in marginal
lift conditions is challenging but extremely rewarding. The
last day and on the way home, we stopped off at another
fantastic slope site used frequently by the slope racing
competition fraternity, but one where we had flown may time
before. This time an Easterly facing site on the "Bwlch"
overlooking Treorchy down in the valley. This time the wind
was was gusting around 25mph onto a shear cliff face of
around 300 ft with a rounding slope leading from the valley
floor up to the base of the cliff. As common with very steep
hills, there is a rotor (turbulence) on the top of the hill,
making ladings tricky, but the landing area was pretty big
so we could move away from the major turbulence. However,
having put the Dudes and Jarts together, we enjoyed a couple
of hours of BIG AIR. 60 inch models undertaking inside and
outside and knife edge manoeuvres that were so big, that any
powered flyer having a stir of the stick would have been
converted to slope soaring instantly. Any powere flyers
reading this should really have a go. When the wind is a
little too strong on the powered field, get up the hills,
its Great Fun!
Anyway, I will update you
after the weekend adventure at Leek and Moorland with
hopefully some photos and a video of the first flights of
Neil's Genesis.
Till then, Happy landings
CW |
|
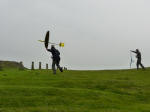
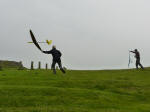
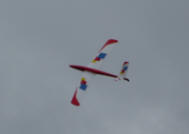
18/Aug/12 - First Flight
Genesis 2#2 |
|
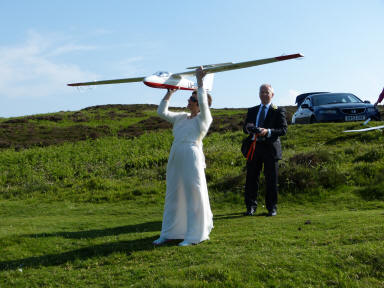
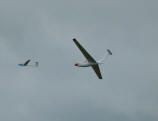
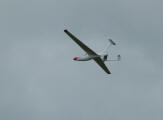
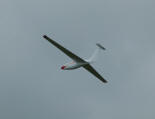
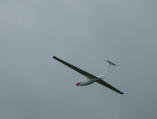
Smiles all round.....
Yesterday I joined Neil at
the Leek and Moorland Scale Competition. We took a number of
models, the Libelle, ASK and the Pilatus, but the real show
stopper was Neil's Genesis 2
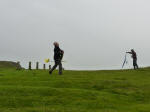
Once the rain had passed,
much later than forecast, we decided to commit a few models
to the air. The wind was slightly off the slope but the lift
was ok, but not in abundance. As the afternoon progressed,
the wind came round to be on the slope, but it still didn't
give the amount of lift we expected. (reckon we had been
spoilt by or holiday in Wales)
The Genesis was assemble,
and soon became the the topic of conversation. Controls were
checked, programming tweaked, then checked again and it was
time to make the decision. Fly or not to Fly? Neil made a
quick decision and armed with a Camera/video, which I gave
to someone else to film the launch, all was set.
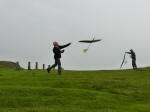
The fuselage is pretty
wide, so I went armed with a surgical glove. Not for
anything sinister, although I thought I might have to help
Neil with his bicycle clips........... Seriously, I was not
taking any chances with the launch. The glove was so that I
could get a good purchase on the fuselage and so it did not
slip out of my hand when I launched it.
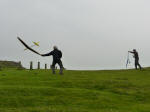
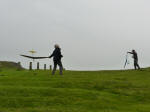
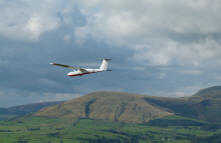
Controls checked, clear
above and behind...........A quick run up and good positive
push forward and the Genesis was away.......... Wow! A few
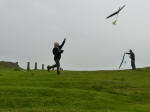
clicks of down trim was all it needed to fly straight and
level. During the flight the stall was checked and did not
provide any surprises. Stall was straight with no wing drop.
The Centre of Gravity seemed a little far forward as the
dive test proved, but we were airing on the side of safety
for the first flight. The model looks good in the air. See
for yourself.
Neil had two flight with
Genesis during the day, and has now gone home with a few
idea and things he want to tweak before we take it along to
the Long Mynd scale Fly-in in September. I don't know if my
Genesis will be ready by then. I have to do some repairs to
the Pilatus, having had a mid air with another Pilatus at
the Leek and moorland event.
We need a better day to
take more photos and show the Genesis off to its best
potential. It was certainly a talking point though.


And on a humorous note,
Tigger (the rooky pilot) and new member of the Ninety Nine
Acre Wood Gliding Club had a good time.
I'll be back again soon
CW
Back to top |
|
11/Sep/12
- Genesis Video |
|
Since the first flight of
Neil's Genesis, I have been trying to edit the video footage
of its maiden flight. However, a number of computer hardware
problems has resulted in delays to updating this website,
and getting to grips with video editing. It's all sorted now
and I have uploaded the first video onto Youtube. Click on
the link below:
My initial upload was not
particularly good as youtube edited the film to stop the
shakiness of the video such is the nature of hand held
videos trying to follow a quick model being put through it's
paces. The video had a weird effect, so I have now removed
it and added a few better videos.
http://www.youtube.com/watch?v=7FqDQh9hCAQ
A second video, slightly
better footage of the test flight and includes a number of
still photos capturing the story so far. Take a look for
yourself
http://youtu.be/UzHUFSAhH70
.jpg)
.jpg)
Last week, Neil and I attended
the RAF Model Aircraft Championships at RAF Honington in
Suffolk. On the Saturday Afternoon, we returned to Neil's
place in Lincolnshire, prepared our scale models and was up
exceptionally early the next Morning (5:00am), to drive the
3 1/2 hours to The Long Mynd in Shropshire, to attend a
Scale Competition.
We flew the ASH, Libelle and
the Pilatus B4, Yes I had managed to repair the Pilatus
after the mid air at Leek and Moorland a few weeks earlier.
Aesthetically, you can't see that the model has been
repaired and it flies just as it always has, Great!
The Genesis model, turned a
few heads and was the subject of much debate, but sadly it
did not fly as the Aileron servo gears suffered some damage
during a launch. This has now been repaired and we await
good conditions for our next outing.
I have been back in the weasel
workshop, between editing video, updating the website. I
have been sanding the Genesis wings in readiness for the
ailerons to be cut out and Spoilers to be fitted. Now I have
finished uploading videos, work on Genesis should now pick
up pace, and I hope that I will have it sorted in a few more
weeks, I hope.
Some more photos to come of
the finished model, when I get there and I hope more video
of the maiden flight.
See you soon
Colin
|
|
23/Sep/12 - Genesis update |
|
Yesterday's weather was an
exception, cloudless sky, great visibility, but alas, no
wind! pity, as it would have been fantastic up on the hill.
At least it gave me the opportunity to get back in the
workshop.
Work has recommenced on my
Genesis. I have now re-glassed the wings having sorted a few
problems with my previous effort.
The wing has a further 25g
cloth and epoxy covering and I await for this to cure
properly so it can be rubbed down, following which, I need
to cut out the ailerons; a job for next week.
I have been sorting out the
canopy frame, now finished, and also progressing the work on
the cockpit interior.
Also if you did not see the
link to the latest video that I uploaded to youtube last
week, then the link is below: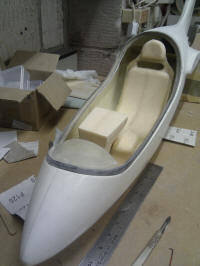
http://youtu.be/UzHUFSAhH70
This presentation is slightly
different to those offered previously. Indeed, it has a
number of still photos and captions depicting the story so
far from concept to first flight of Neil's model, with a few
photos at the end captured from the video.
Hopefully the next video will
be of my own Genesis 2 test flight, which I hope to
undertake before the weather turns for the worst. Still much
to do.
See you soon CW |
|
01/Oct/12 Roll Control |
|
  Whilst
I have not been getting out and doing much flying due to all
this rainy weather, it has allowed me to get back in the
workshop to progress my Genesis. Whilst
I have not been getting out and doing much flying due to all
this rainy weather, it has allowed me to get back in the
workshop to progress my Genesis.
The wings have now been
trimmed, and treat to a couple of coats of sanding sealer
and rubbed down. Also the Ailerons have been cut out and the
mating surfaces filled with epoxy and micro balloons. Next
is to install the Spoilers, the wing surfaces can then be
finished off.
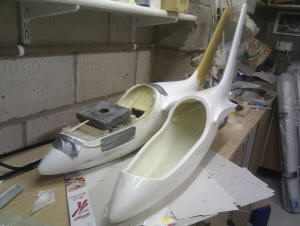
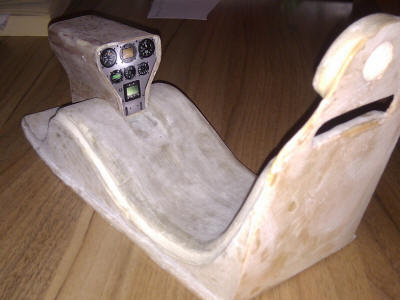
The cockpit interior is also
coming along; most of the foam has been removed now the
structure has been coated in glass cloth. The instrument
panel is also coming along, this is still a mock-up, but the
photo below gives you an idea of what it should be like once
everything is rubbed down and painted. The instruments can
then be assembled properly.
I have also been working on
the fuselage. The aero tow mechanism is now installed in the
nose, and also the rails, on which the cockpit interior sits
on. A brace has been installed internally across the rear
wing seat to stop flying loads and any abrupt landings from
allowing the wings to squeeze the fuselage.
I must thank Curt Lewis in the
States', who has been really helpful. Curt owns a full size
Genesis and has provided me with some really good
information some excellent photos. In fact, he has many
youtube videos of his aircraft in action. The link below is
of Curt in his Genesis dumping water ballast on a fast
flypast. Pretty cool!
http://www.youtube.com/watch?v=ZQWhEjwRIMk&feature=plcp
Now that's food for
thought..... How cool would it be to fly across the slope
and vent water ballast just like the real aircraft.......
There's still a way to go on
my project, but once the canopy is fixed onto the frame and
everything is checked for alignment it'll be time to don the
mask and start painting.
Back soon. CW
|
|
18/Nov/12 - Pilot ready and
waiting |
 Sorry
for my lack of updates but progress has been slow. Sorry
for my lack of updates but progress has been slow.
Since my last update, I have
been quite busy at work trying to get ahead of the game so I
could go away on holiday. a couple of weeks ago I spent a
really good week in Shropshire with my partner at a really
nice B&B in Church Stretton, one that we visit quite often,
being at the foot of a favourite range of hills called The
Long Mynd - Well worth a visit both from a flying point of
view and the fact that there are some fantastic walks and
country side. I just had to take a model, the walks we quite
good too, we even spent an afternoon exploring the Castle at
Ludlow. We had a really good time and the weather wasn't too
bad either, allowing for a few hours flying either early in
the morning or when we got back from our outings, prior to
nightfall. One evening there was a really good sunset which
coincided with a westerly wind and a visit to "pole Cottage"
the "Long Mynd's Westerly slope - a really nice sun down
flying session.
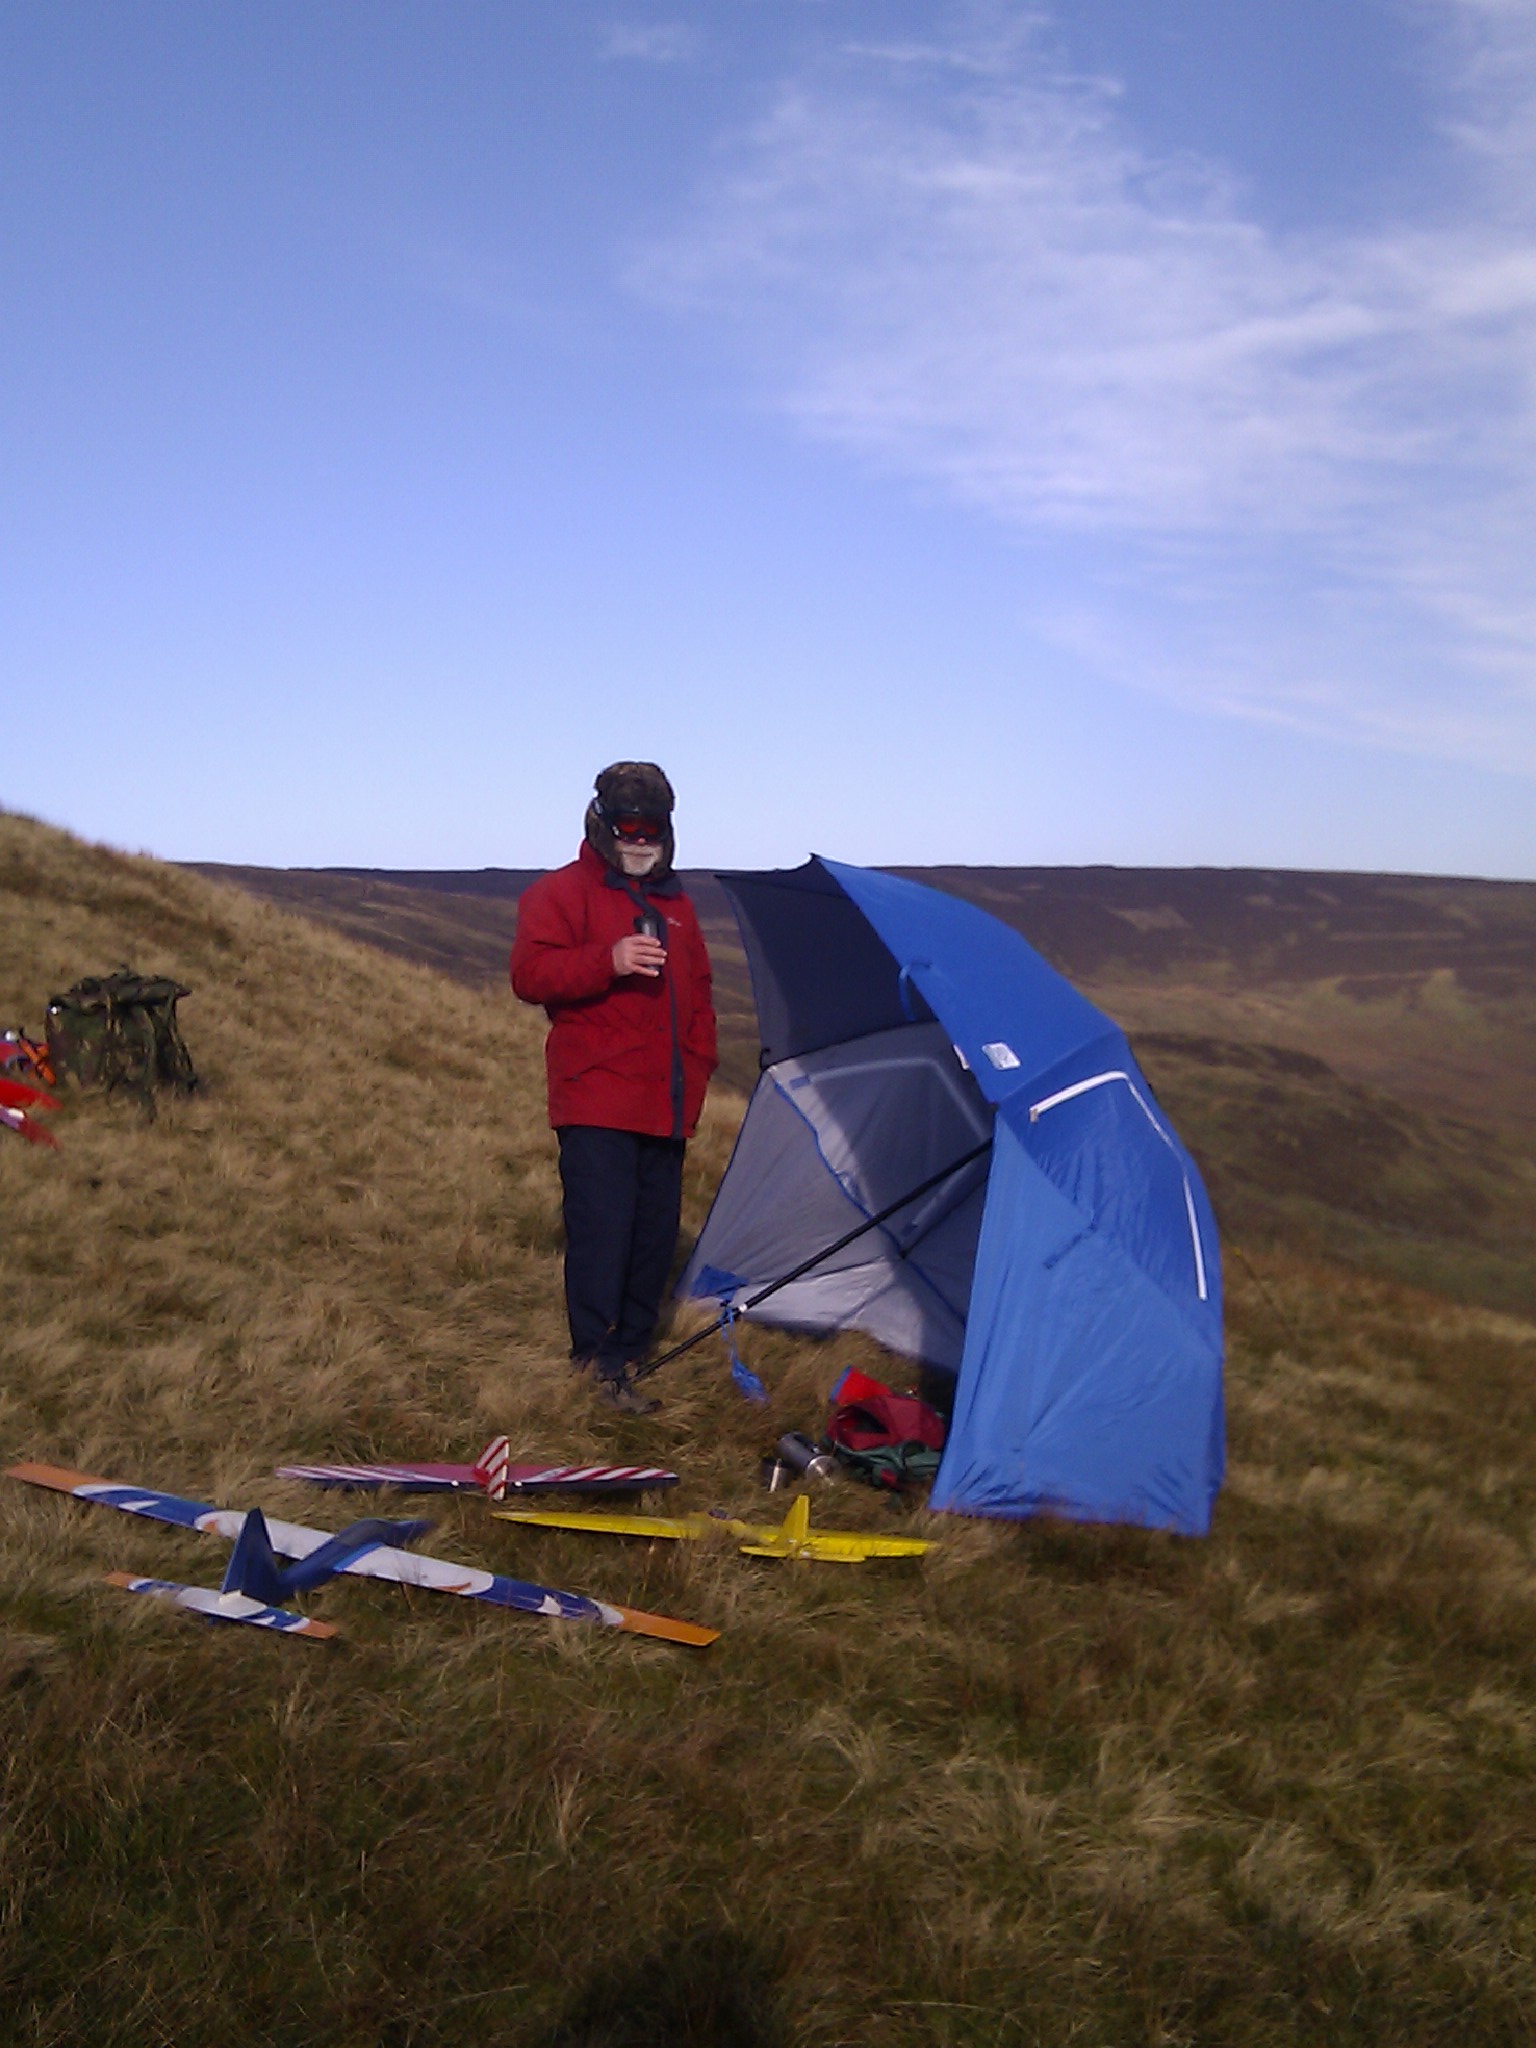
The following weekend, Neil
and and Sue came up to Lancashire -the girlies going out to
find craft shops, such are their interests, whilst Neil and
I spent two full days up in the hills getting cold but
having a really good time - plenty of lift. Glad I took my
sports shelter to hide from the icy Eastlery wind though.
 The
Genesis has been progressing, albeit at a slow pace. I
haven't been able to get much done during the evenings due
to work commitments and the weekends being taken up with
other things, as well as making the most of the conditions
to go flying. However, there has been progression none the
less. The
Genesis has been progressing, albeit at a slow pace. I
haven't been able to get much done during the evenings due
to work commitments and the weekends being taken up with
other things, as well as making the most of the conditions
to go flying. However, there has been progression none the
less.
The cockpit (Seat,
Instrument panel) has now been finished including the
joystick which is mounted on a ball link allowing it to
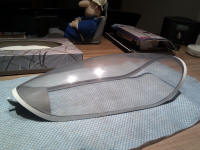
move. The Canopy took a good deal of time to get right.
Damaging the original transparency while I was trimming it,
so I had to cut and trim the spare.
Designing and getting the
front canopy hinge to work also took some time to get right.
Many attempts has now resulted in a plywood offset hinge and
I/m glad to say works really well so the canopy now hinges /
tilts from the front, which sits nicely in place with the
Cockpit installed. The Spoilers have now been installed and
the stabiliser/tailplane assembly and linkage has been
completed and the incidence set with respect to the
mainplane incidence.
 All
that is left to do is cut the holes in the wing root of the
fuselage to accept the additional front locating pins and
wing retention mechanism and the holes for the wing control
plugs. A final sand and tidy up of the fuselage, hopefully
this week and then it'll be ready for the paint finish next
weekend. All
that is left to do is cut the holes in the wing root of the
fuselage to accept the additional front locating pins and
wing retention mechanism and the holes for the wing control
plugs. A final sand and tidy up of the fuselage, hopefully
this week and then it'll be ready for the paint finish next
weekend.
Whether I get to test fly the
Genesis before the turn of the year remains to be seen,
but if the weather
Gods are on our side, it may just happen. Lets keep our
fingers crossed.
Hope to bring you an update
next week.
CW
|
|
25/Nov/12 - Genesis starts to
get its plumage |
 All
the additional construction work was finished during the
evenings last week. I wanted to start the painting on
Saturday, but unfortunately I had to work. So on Friday
evening, I ventured into the workshop to give the whole
airframe a light dusting of primer. This was done primarily
to highlight any other blemished on the airframe that I had
missed and that would need filling. All
the additional construction work was finished during the
evenings last week. I wanted to start the painting on
Saturday, but unfortunately I had to work. So on Friday
evening, I ventured into the workshop to give the whole
airframe a light dusting of primer. This was done primarily
to highlight any other blemished on the airframe that I had
missed and that would need filling.
On inspecting my handy work
on Saturday evening, it was evident that a few areas of the
fuselage needed a little filler mainly on the mould seam
line due to a few air bubbles in the Gel coat. On Sunday
Morning, no, not an early start, but having rubbed down the
filler from the night before, I was soon in a position to
start applying Genesis's plumage. The fuselage was hung up
and given a number of coats of primer, checking after each
coat, and the flying surfaces also receiving a coat or two
of primer.
 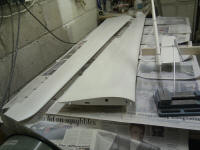 Later
on this evening, I managed to give the Fuselage a coat of
Gloss paint. she is starting to look really nice. The tail
and rudder has also had a coat of gloss. I don't normally
use gloss, instead I opt for clear lacquer on top of the
primer, but Neil's model looked good having received both
primer and gloss, so I though I would give this a try
myself. It has come out really well, although when fully
hardened I will flatten this gloss finish with 2000 grade
wet and dry and give it a good polish to get a nice even
high gloss finish. Later
on this evening, I managed to give the Fuselage a coat of
Gloss paint. she is starting to look really nice. The tail
and rudder has also had a coat of gloss. I don't normally
use gloss, instead I opt for clear lacquer on top of the
primer, but Neil's model looked good having received both
primer and gloss, so I though I would give this a try
myself. It has come out really well, although when fully
hardened I will flatten this gloss finish with 2000 grade
wet and dry and give it a good polish to get a nice even
high gloss finish.
The canopy frame has also
had its paint; so, short of a polish of the transparency,
the canopy is all but done.
Tomorrow evening, I will be
attending the regular winter evening indoor flying session,
so this will keep me out of the workshop until Tuesday, when
I should be able to progress the paint job further.
Until the next update.....
|
|
2 /Dec/12 Almost there.... |
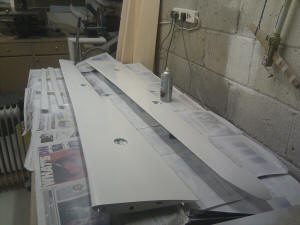 Whilst
the weather has been clear and sunny this weekend, there's
been very little wind, and it's been pretty cold. Indeed,
the frost has not melted all today, and there's snow on them
there hills, and more is forecast. However, that has allowed
me get back in the workshop. Whilst
the weather has been clear and sunny this weekend, there's
been very little wind, and it's been pretty cold. Indeed,
the frost has not melted all today, and there's snow on them
there hills, and more is forecast. However, that has allowed
me get back in the workshop.
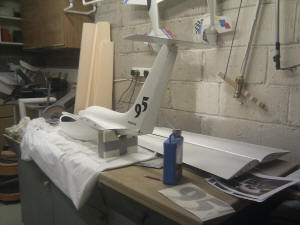 During
the evenings last week, I was busy painting the wings. The
top coat being applied yesterday, Saturday. After a
leisurely breakfast this morning, I turned up the heater in
the workshop, but did not stay in the workshop, far too cold
initially. Instead, I put the computer to work, to size,
print and cut out the aircraft registration numbers and
lettering. During
the evenings last week, I was busy painting the wings. The
top coat being applied yesterday, Saturday. After a
leisurely breakfast this morning, I turned up the heater in
the workshop, but did not stay in the workshop, far too cold
initially. Instead, I put the computer to work, to size,
print and cut out the aircraft registration numbers and
lettering.
I ventured into the
workshop at around 11am, the room had warmed up a little by
then. I started the job of flattening the paint on the
fuselage with rubbing compound and polishing to a good gloss
finish. Once this was done I applied the lettering. I also
installed the rudder and stabiliser servos. The photos do
not do it justice, but I am pretty please with the outcome.
The wings are still awaiting some attention and this will be
the activity for the coming evenings; the paint needs
flattening and polishing, Spoilers need to be painted
inside, and the radio gear needs the final components
installing. I removed the Spoiler servos so the wings could
be painted, so these need to be reinstalled and the aileron
servos need to be installed completely. Ailerons will need
to be attached and then connected.
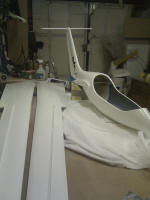 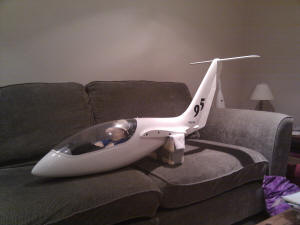 Things
are looking good Neil and I have arranged a flying session
on the 15th December and hopefully, weather permitting of
course, Genesis will take to the air. That's the plan
anyway. Things
are looking good Neil and I have arranged a flying session
on the 15th December and hopefully, weather permitting of
course, Genesis will take to the air. That's the plan
anyway.
So here's to a productive
week of evenings and hopefully all that will be left for
next weekend will be to programme the radio, and take a few
photos.
See you soon
Colin
|
|
5/Dec/12 Airbrakes |
|
Work is progressing well. The wings have been rubbed down
and polished and the subject aircraft competition ID
markings applied. The spoilers have been painted,
reinstalled along with the associated servos, and checked
for operation, although I still need to sort out the servo
covers for these. I
am now installing the aileron servos. but this is taking a
little time to get the servo mount right to maintain the
clearance for the servo arm and ensure that the servo covers
seat properly. Hopefully, these should be done by Friday
evening. Then I can make up the wing wire harness and get it
installed.
I reckon by
the end of the weekend It will be finished. So lets hope
this dreadful cold weather clears ready for the test flight
on the 15th, don't know the venue yet, it all depends on the
weather and wind direction. hopefully I will be able to
bring an update on the build in the next day or so, and then
hopefully get a few photos of the fully assembled model.
Watch this space.
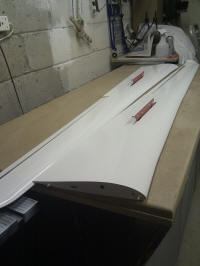
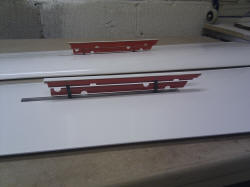
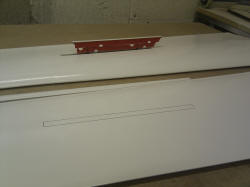

Back to top |
|
Friday 21/Dec/12 - All done |
Almost to the day, during a post winter solstice flying
session with Neil last year, from when the idea of a ¼ scale
Genesis 2 was conceived, I can now report that my Genesis 2
creation is ready for its test flight. I was hoping to get
the model to a flying condition last
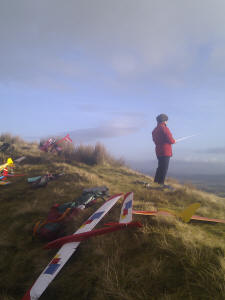 weekend,
where it could have been test weekend,
where it could have been test
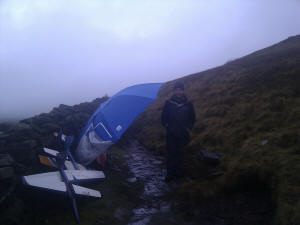 flown,
and although Neil came up to Lancashire for a spot of
flying, the wind direct and conditions were not suitable.
Saturday saw low cloud and rain showers throughout the day,
although we did go flying!..... Sunday whilst cold and
bright, the winds were very light an variable, Both days
were west to South West which would have made landing on the
face of the hill somewhat tricky with a New Scale Glider.
Notwithstanding this, the model was not quite ready anyway. flown,
and although Neil came up to Lancashire for a spot of
flying, the wind direct and conditions were not suitable.
Saturday saw low cloud and rain showers throughout the day,
although we did go flying!..... Sunday whilst cold and
bright, the winds were very light an variable, Both days
were west to South West which would have made landing on the
face of the hill somewhat tricky with a New Scale Glider.
Notwithstanding this, the model was not quite ready anyway.
The servos and wing wiring harness have now been installed
and servos covers fettled, painted and fitted. Last night I
assembled the whole airframe ensuring that the wing joiners,
locating pins and plugs lined up correctly. That done, I
tweaked the Elevator and Rudder servo installation prior to
applying lead weight to the nose to balance the aircraft and
get the centre of gravity in the correct position. I still
have to fix the lead in place so it does not move during
flight, and at some time. I also need to fit the Aerotow
release servo, but this additional control can wait until
after its first flight.
I weighed the whole model last night, my kitchen scales
deciding not to play as the model exceed its 5kg limit. So,
armed with the bathroom scales, I weighed the model which
came out at a respectable 5.3kg (11.5lb). I have not quite
worked out the wing loading yet, but given its generous
proportions, I have no doubt that this will be well within a
respectable tolerance.
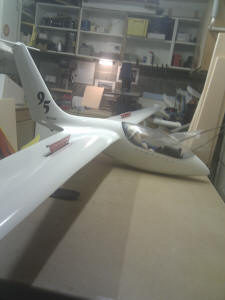 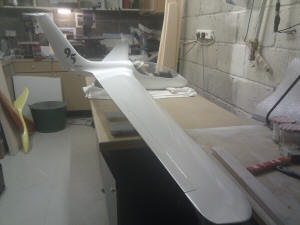 Unfortunately
the weather forecast is not good for this coming weekend,
more rain and high winds I’m afraid. But hey, the model will
get to fly as and when the conditions are right, hopefully
sometime over the next few weeks. I have now finished work
for the Christmas break and I hope that the weather will at
least allow me to take some photos of the complete airframe.
Watch this space for the photos. Unfortunately
the weather forecast is not good for this coming weekend,
more rain and high winds I’m afraid. But hey, the model will
get to fly as and when the conditions are right, hopefully
sometime over the next few weeks. I have now finished work
for the Christmas break and I hope that the weather will at
least allow me to take some photos of the complete airframe.
Watch this space for the photos.
This project has definitely been an adventure, a labour of
love at times but, I am more than happy with the outcome.
Definitely well worth the effort on looks alone. To say I’m
really chuffed with the model would be an understatement,
especially that it is actually only the second large scale
glider I have built, the Pilatus B4 being the first from a
kit, but the Genesis 2 project was a whole new giant leap,
to build from the CAD drawings, make the Mould and
experiment with different techniques to acquire the desired
outcome. Definitely a great experience, I just lovemaking
things!
I am really looking forward
to getting some air beneath its wings and putting it through
its paces and to report on the outcome with some more photos
and video and it would be really speciall if I could get
video of both G2’s flying together, however, this may be
something for a later outing. For now, its one step at a
time. If it happens, I’ll bring you an update.
I would really like to thank Jim Marske (Designer) and Curt
Lewis (Owner , 95) for all their help along this journey,
without which, Genesis 2 may not have been built. Thank you.
Here’s wishing you all a very Merry Christmas, and hope you
have great New Year with clear horizons and fantastic
weather.
|
|
23/Dec/12 - Ready to go |
|
The weather cleared for a while today although the wind was
gusting 30mph, but I wanted to get the Genesis out of the
workshop and venture up to Jeffrey Hill for a photo shoot.
The wind direction was not suitable for this
drive-to-the-top hill, and given that it was about 15:30hrs
with fading light, a maiden flight was not expected, I just
wanted to capture the complete model outdoors.
So as promised. Feast our
eyes on Genesis 2:-
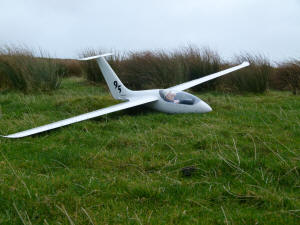
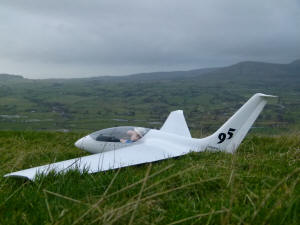
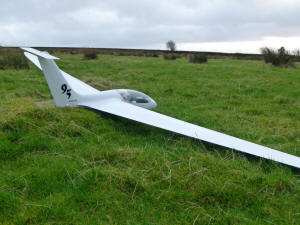
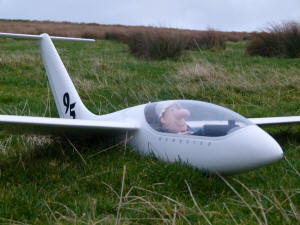
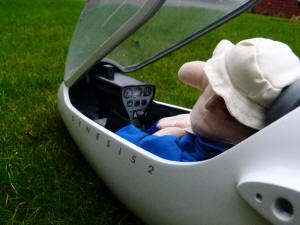
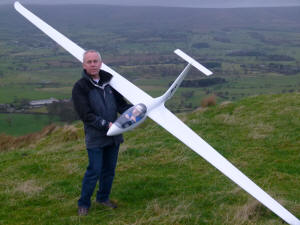

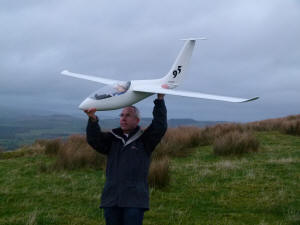
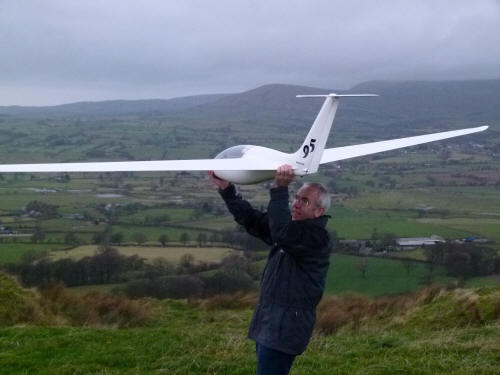
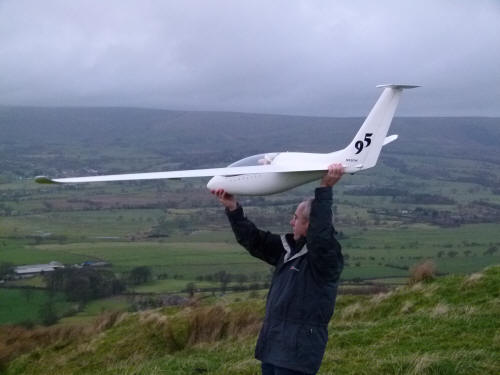
Even though I do say so
myself, the model looks great and it just looks and feels
like it just wants to fly......... I can't wait until the
weather is suitable for its test flight - Lets hope we get
some good weather soon.
I'll bring you updates as
soon as I can. Hope you all have a really great Christmas.
Colin W |
|
Thu 3/01/13 - Forecast is Good |
|
Happy New Year
to you all.
Christmas for
me was quiet, I even managed to stay out of the workshop for
Christmas Day, my partner and I went out for the day and had
a Christmas lunch / picnic - turkey sandwiches, mince pies
on top of "Gummers How" overlooking lake Windemere in the
Lake district. (wish I'd taken a model.) We have been
planning a Christmas picnic for many years, but the weather
always got the better of us, but this year we were
determined regardless of the weather. As you can see, the
cloud cleared for us providing us with quite a dramatic
view.
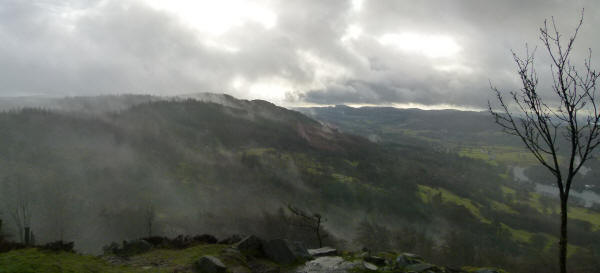 
The Christmas
weather has not been conducive to flying, mostly low cloud
and rain. However, the forecast is good for the next few
days, Neil is available, so we're off to the Leek and
Moorland SW flying site, this is just to the east of the
town of Leek in Staffordshire. The venue just happens to be
equal distance for both of us. Indeed, its where Neil's
Genesis was test flown. So, Given the fact that My genesis 2
is ready for its maiden flight, the weather is forecast to
be W / SW 9 mph possible gusts to 15 mph I think its time to
get some air beneath its wings; a promise of a pub lunch is
also appealing. I hope to bring you the photos and video, so
stay tuned as they say.
However, I've not been idly
watching tv and getting bored, as you may have guessed, I
have been in the workshop. A new canopy and frame for the
Pilatus B4, which was damage earlier in the year, a new vac
bagged wing for a new sporty flying wing design under
development. The new wing
is a tapered wing rather than the original swept back design
which I have made to compare the flying qualities.
And, I've got a present for
Neil, who on his last visit to Lancashire for a
for pre-Christmas flying session did show some interest in
my Genesis 2 cockpit. So over the last few days, I've been
creating a cockpit for him. And of course, Goofy just had to
test it out.........
 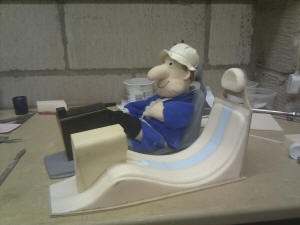 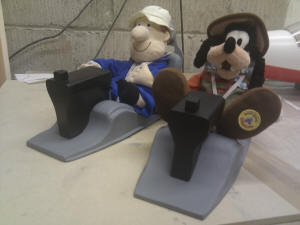 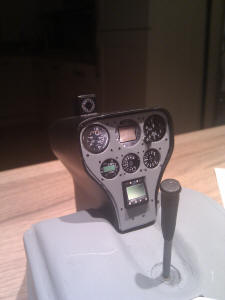
The seat is primarily
fabricated from foam, glued to an 1/8" ply base. The foam is
shaped on the band saw and a 1/4" sliver removed for the
seat cushion, which is subsequently reduced in width by
about 1/2" and stuck back on to the base and then the whole
assembly covered in two layers of 160g Twill weave glass
cloth and epoxy. I use Twill weave cloth as it moulds very
well to intricate shapes. The instrument pedestal is also
made from 3 pieces of foam and assembled before covering
with obechi wood veneer then a layer of 49g glass cloth. The
instrument panel is a good quality photo behind a layer of
plastic (Margarine tub - well, one has to recycle!) with the
instrument holes cut out. the control column is made from a
plastic tube and carved car body filler for the hand grip,
which is mounted on a 2mm steel rod and is pivoted on a ball
link allowing the stick to move. It wouldn't take too much
to get this to move with the radio control, but not this
time. Every time I make things like this, I am on a learning
curve, Neil's cockpit being in my opinion, better than my
own and uses slightly different techniques honed from the
first attempt. Indeed, this cockpit went together in just a
couple of days - most time was waiting for the epoxy to
cure. Pretty convincing I think - Hope Neil is pleased with
his new cockpit, although I think Goofy will have to wait.
Anyway, I'm off to get
ready for tomorrow, an early start to meet up at Leek for
coffee and croissants at 9am, (well, one has to live well!)
prior to some flying. Hopefully back tomorrow with some
photos.
CW |
|
Fri 4/Jan/2013 |
|
Having got up really early, breakfast and on the road for
7am, still dark, for the 2 hour drive to Leek and Moorland,
the weather gods were not looking kindly on myself and Neil.
When almost at the flying site, it was obvious that the hill
was shrouded in cloud. In fact, all the surrounding hills
were in cloud, but not to be put off, on arrival, I duly
parked up at the chosen site and awaited Neil's arrival.
Indeed I was looking forward to the croissant and coffee I
had taken.
New year pleasantries out
of the way, we both settled down for our second breakfast of
Croissants and fresh coffee in my car out of the cold breeze
and drizzly rain. We exchanged Xmas stories and discussed
what shiny things Santa had brought. Neil was made up with
his new cockpit and it almost fit his Genesis straight off.
It just needs an 1/8" of the base trimming and it'll be a
perfect fit.
The weather was still not
showing any signs of easing and conversations led to what
models we had brought along for the days flying. For once, I
had taken along more models than he, 7:5.!!!! This is a
major event as we always take a number of models to cover
differing weather conditions, but more often than not, he
seems to always pack in more than me. To give you an idea,
when we both went on holiday together down to Rhossili in
Wales, on one day whilst the girls were off sight seeing,
were managed to pack 24 models into Neil's car and there was
still room for the others that we left in the cottage. Well,
we have to be prepared for all eventualities.
(full Rhossili story link )
Anyway, I digress.
The weather did clear at
about 11.30 and having donned our wet weather gear and
boots, we ventured out on to the moor top and launched our
small flying wings (Wotsit and Weasel) to check out the air.
Not so much lift and no sooner had we launched we saw a few
other models also flying in the distance to our left. A
quick landing and back to the car to check out the other
modellers and more importantly, see what frequencies they
were using. Good job as most were on 35MHz which Neil was
flying on although non of the frequencies clashed. Not so
much of a problem for me on this occasion as I was using
2.4GHz, which, due to the frequency hopping characteristics
of the radio, does not suffer from cross channel
interference.
A group of locals had
congregated on an alternative flying site just a mile 1/2
mile down the ridge catering for a more Westerly wind
compared to the S Westerly direction of our original slope.
However, this slope was not really working too well either,
with the lift being very light, but all modellers together!
After an hours flying, we decided to have lunch - no not the
pub lunch that was discussed, as both our partners had
packed up a suitable selection of sandwiches and cakes. Oh
the spoils of Christmas fayre.... after which, further
flying ensued. The wind was now strengthening and moving
round to the S West. was it time to get the Genesis out?
After a while the locals
started to pack up and we decided to move back to the
original slope with a view of getting the Genesis ready for
its first flight. This was not to be, as I had noted on our
walk back to the cars, that the neighbouring hill tops were
now shrouded in cloud. By the time we had transited the 1/2
mile to the new site, we were also in cloud. A good strong
wind, probably too strong, but we could not see the track to
the slope face, let alone the horizon. More coffee and a
thought that we could sit it out until the cloud clearred,
but to no avail, patience would not bring good weather as
the light was beginning to fade and no sign of the cloud
lifting, so the decision to go home was made.
Funny thing though, just 5
miles away from the moor land there was light blue sky and
light cloud, but this only lasted until I reached the
motorway and over the 90 mile journey home the cloud base
got lower and lower until there was no horizon and just
rain.
So here we are, now
awaiting a new day for Genesis to make it's maiden flight,
but patience is a virtue. I'll let you know when it
happens.
Back to top |
|
Wed 5/Feb/2013 - Still Waiting |
It's with frustration that I have to report that the weather
has not been good since the turn of the year. Mostly Rain,
but more recently snow, not that we couldn't get around but
the roads up to the local hills have been too hazardous to
venture to the flying site, therefore, Genesis has been kept
in the workshop awaiting flight trials.
Although the forecast has not
been too favourable, I found myself waking last Saturday
morning to a totally unexpected beautiful day, albeit very
cold, it was a cloudless blue sky and a Northerly 9mph wind,
just right for Jeffery hill. But........ I had planned other
things so by the time I was ready to fly, the clouds had
rolled in and the wind dropped to but a slight breeze.
Looking at the forecast for Sunday, Low cloud, rain.......
and yes, I'd missed my opportunity. Indeed, low visibility
(I couldn't see the hills) and rain for most of the day.
Here we are, still awaiting
a nice day for Genesis maiden flight.
Life in the Workshop has
not been void of activity though. My new O/D flying wing
sports model is almost finished. The new trial 'lost foam'
epoxy/glass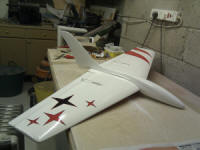 fuselage on the original "Wotsit" highly swept back wing has
now been mated to a new wing. The new design is a more
tapered wing planform and a new aerofoil section. This
should be ready this weekend for a test flight. If all is
well with the new wing, I will be cutting a new swept back
wing with the new aerofoil section and also a larger 60"
tapered wing, all to mate to the new fuselage. If this works
out well, then I will be moulding the new fus with hope that
I may be able to sell a few.
fuselage on the original "Wotsit" highly swept back wing has
now been mated to a new wing. The new design is a more
tapered wing planform and a new aerofoil section. This
should be ready this weekend for a test flight. If all is
well with the new wing, I will be cutting a new swept back
wing with the new aerofoil section and also a larger 60"
tapered wing, all to mate to the new fuselage. If this works
out well, then I will be moulding the new fus with hope that
I may be able to sell a few.
Also on the building board
is an all new "Jart" aeros model designed for high wind
speeds. It has a different wing section to the original to
try and help improve the slow speed manoeuvrability. this is
well underway; the wings have been vac bagged and I'm
currently sorting out the tailplane. I hope to bring you a
few photos of this soon.........
I have planned to venture
down to a favourite range of hills in Shropshire (The Long
Mynd) in a couple of weeks, where I hope to meet up with
Neil. So fingers crossed for good weather. By then I hope to
have quite a few models to test fly - Genesis being one of
them, in readiness for the coming flying season.
I'll report again with more
news soon.
Mr C |
|
Wed 6/Mar/2013 - and still we
wait |
| It
may be Spring time, but it doesn't feel like it. The recent
clear weather has been cold, and now there is a threat of
more snow..... A
couple of weekends ago, my partner and I met up with Neil
and Sue at our favourite B&B in Church Stretton, at the foot
of The Long Mynd, having planned a couple of days flying
while our good ladies had planned to flex the credit cards
and do some retail therapy in nearby Shrewsbury.
The forecast had been ok
until the week prior to our visit, during which, the weather
seemed to be turning cold again; but you know what the
weather forecasts are like, sometimes they are correct,
other times , not so.
Not wanting to be put off
by a little cold weather, we continued with our mission. We
went armed with various models for all conditions, but what
was to greet us on the Saturday morning was not quite what
we had expected. With light and variable N, NE winds; we
tried the "Darnford" slope on the North end of The Long
Mynd, but the wind was not quite on to the slope. So back in
the cars and we ventured around to the NE - E slope
overlooking the reservoir. This slope was working better,
but the lift would come and go, sometimes the lift would be
quite thermic, allowing for some reasonable height gain, but
it was very light and sporadic.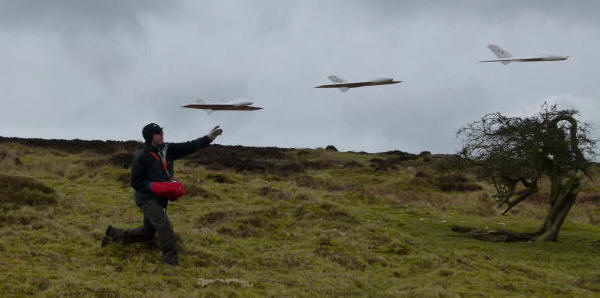
Unfortunately the weather
was not right for flying the Genesis, so it stayed in the
car. However, whilst we predominantly flew our foamy models,
namely a brace of Weasels, which are great fun, I did get my
new flying wing out and gave it some air time.
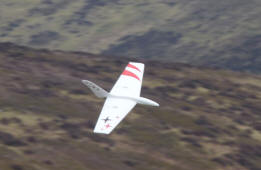
Named Sharky due to the
shape of the fin - my new flying wing sport model initially
presented me with pitch instability with some pitch
oscillations in level flight, but it was not overly
sensitive to pitch input.
The lack of lift made it
impossible to gain enough height to check out the centre of
Gravity aerodynamically, by abruptly diving the model and
watching what happens to its flight path without any pitch
input, and I wasn't prepared to push the model out too far
over the valley - I didn't want to land out and go for a
walk, so I made a landing and added a little more nose
weight to see what difference it made.
The next flight was
promising; the pitch oscillations had stopped and the model
maintained more speed, but I was still unable to gain much
height due to the conditions. Needless to say, the new wing
needs to be flown in better conditions to evaluate it
properly, but the early signs were good. It certainly looked
good in the air.
By 1600 hrs we we both
shivering, indeed, the car temperature gauge said that the
ambient temperature was -2 Degree C, with the wind chill, I
reckon it was actually about -5 Deg C, having drunk all the
coffee in our flasks, we headed back for tea and medals and
the warmth of the B&B.
Saturday evening, saw snow
start to fall (not forecast) and having enjoyed a good meal
and a glass of wine and telling ourselves that there is no
such thing as bad weather just the wrong clothing.....(we
were prepared), we planned our attack for Sunday.
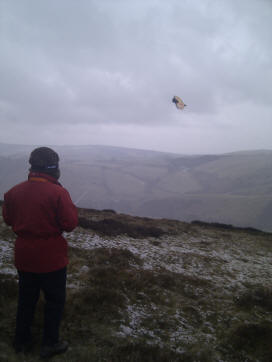
Well, The snow continued to
fall, and by morning everything was covered in a light
dusting of the white stuff. Nothing too significant, but it
had been freezing and with the forecast of a NE wind, it was
back to the reservoir slope, but that plan was dashed after
we found the "Burway", the main route to the top of The Long
Mynd closed due to snow and ice.
Not being put off, we
ventured round to the Northerly slope at Darnford, but
whilst the red kites and other birds were making the most of
the light lift, it did not produce the necessary lift to fly
more than the small foamies, and of course, give my new
model another flight.
a Snow flurry passed
through and although we tried to keep flying we couldn't see
the horizon so we retired for coffee and the warmth of the
car. after the brief snow flurry the wind eased and shifted
round more to the East. So, forever the lift chasers, we
ventured round the back of the Mynd' to see if we could get
to the reservoir slope.
The road was open and we
were soon donning our hats, ski goggles and gloves to try
again. The slope was not working, Neil launched and had a
bit of a walk to retrieve his model. I launched the Weasel
and flew the opposite way to Neil, but there was no lift
there either. We kept trying for a while but by 13.00hrs it
was obvious that the day was not going to get any better.
Cold, with a temperature of -4 degrees C, the threat of more
snow and no lift, we retreated to the warmth of the
accommodation; after warming cup of tea, we packed the cars
and headed for our respective homes.
Funny enough , by the time
we had driven back the 110 miles to Lancashire, it was
sunny, there had been no snow. But I consoled myself with
the fact that the wind direction had also been wrong for any
serious flying.
We'd had a good time
though, and I have just received a text from Neil saying
that he is free for flying for the next 3 weeks, so I'm
keeping a close eye on the weather, although the coming
weekend is forecast to have more snow.
I hope to bring more news
soon.
CW |
|
24 Apr 13 |
The Weather seems to be improving now, and I'm plotting my
strategy to get Genesis into the air.
Unfortunately, up till now, the only decent days with the
wind in the right direction on to the right slope has been
midweek, so I'm to say I'm a little frustrated is an under
statement.I have a
couple of modelling away days planned in May and June which
are not too far away. I promise, as soon as I have some news
you will definitely hear about it.
CW |
|
11 Jun 13 |
| I
know, I know,.... I've not kept you totally up to date,
sorry for the lack of information.
I have been trying to get
the lift beneath Genesis wings but its either been too wet,
wind not in the right direction, or no wind at all. That
said, I have not been sat idle either. I ventured down to
the RAFMAA 3 day Slope meeting back in early May, again the
weather was not quite suitable, but I did get some good
flying in; it was either very light and thermic or a howling
gale. On the day it was blowing somewhat, I aired my Jart
and Dude Models, perfect for the condition, I only had a few
takers to have a go with the Jart, but those that did, said
it really grooved and gave the tranny back reluctantly. I'm
actually building another one of these, and its now at the
painting stage.
Having demonstrated the 60"
Dude flying wing, I have have secured orders for three
fuselages which are now complete and should be delivering
these when I go away on a modelling holiday...... Oops I let
that one slip :-). Also, I've made 2 new plugs ready for
making the moulds, one for a new Dude Fuselage (with canopy
hatch), and another secret weapon..... small aerobatic model
which is the next model on from the "SmArt" model featured
on one of my other web pages... more news on this as it
progresses.
Well, what of the Genesis?
No its not flown, but I
plan to take it on holiday where we'll be meeting up with
Neil and his good lady for another Model Flying
expedition... I will come back to you with the news very
soon. I'm also getting married while away, so may well be a
double celebration..
In the mean time, I suggest
you look at the news article - "Aerotow"
which shows that I have been out and about and have taken my
first steps into the realms of aero towing. What a fantastic
weekend. Good weather (no rain) and a very successful
outcome to what seemed like a immense daunting challenge.
See you soon
Colin W
|
|
24 Jun 13 - Wind Beneath Her
Wings |
|
It's been a long time coming
but Genesis has finally flown…..
Last week my good lady and I
had arranged to meet up with our good friends, Neil and Sue
at our favourite B&B in Church Stretton for a flying
holiday. The girls going off to visit craft fairs etc whilst
the boys go flying. In fact this holiday, was slightly
different to our normal outings to the Long Mynd. Indeed,
although were at our normal B&B, we were effectively house
sitting whilst the owners had gone away on their own
holiday, leaving us with an extra bedroom to invite other
like minded friends, so three couple together.
The weather during the week
turned out to be quite light and variable. Saturday was good
with a nice steady wind from the West but not quite suitable
for the Genesis test flight. Unfortunately the wind and
conditions got lighter and predominantly from the North East
as the week progressed leaving us chucking discuss launch
gliders most of the time.
Wednesday was by far the
brightest day with plenty of sunshine, but still light winds
from the North East. However, there was a little digression
for Wednesday's activity as I had instructed my flying
buddies to bring a suit and a shiny pair of shoes. Whilst we
flew the light winds in the morning, after a light lunch we
all donned our best bib and tucker and ventured to Ludlow so
that my partner and I could get married followed by a photo
session around
Ludlow Castle, and then more
photos in the garden of our B&B accommodation. After a well
earned break...... a good cup of tea..... we were off to the
hills again, this time with the girls in tow for more photos
with Julie lining up the Pilatus for a wedding day
launch....Yes flying on my wedding day, Love is!
We got some funny looks from
the many walkers out and about that afternoon, and rightly
so. Its not everyday that you see a group of nutters dress
up like they're going to a wedding (we'd already been)
running around the hills playing with toys.
At around 6pm, we packed up
and went back to the accommodation and made ready for the
evening meal at a fantastic Tapas bar called Housmanns. Well
worth a visit if you go to Church Stretton!
Thursday was a bit of a wash
out with low cloud and rain, but we did manage a walk into
the hills in the afternoon, but no flying, although I did
carry a model just in case.
Friday, however, was a
completely different day. The wind was back from the West,
on the best slope, Pole cottage, Ideally suited for for
scale gliders. The conditions started quite light, but by
midday, the wind had picked up with some nice sunny
intervals creating good thermal activity.
Having checked out the
conditions with various type of models we made the decision
to get the pair of Genesis 2’s from the car and make ready
for a test fly and fly them together. After photos of the
models together, Neil was first to take to the air checking
out the conditions with his Genesis, this time having
familiarised himself again with the flying characteristics
he flew a loop which was very impressive and nearly came
unstuck when he executed a stall turn close in to find that
it tucked under in the vertical dive, an indication that it
is tail heavy. He did however, have plenty of height to
recover from the dive and flew around a little while longer
before making an excellent landing.
Having checked my centre of
gravity which was a little way in front of Neil's CoG
position we lined up for the launch. It took a couple of
launch attempts; as with any flying wing, the attitude at
the point of launch is critical. However, on the third
attempt the model cruised away straight and level with no
trim change.. With knees shaking I familiarised my self with
the controls, and whilst it didn’t create a major problem I
noticed that the Spoilers were being sucked out into the
airflow by about 5mm. Obviously, the spoiler locking
mechanism needed slight adjustment. but the model was
behaving very well. Stalls we executed which were somewhat
benign in nature and the model just ate up the sky when put
through its paces. The CoG was checked out aerodynamically,
and seemed to be spot on with the model just slightly
pulling out on its own from a fast dive. My confidence was
short lived though and what followed surely tested my flying
abilities to the full….
After about what seemed like
about 10 minutes flying around, I noticed that the left hand
spoiler had driven fully out and could not be retracted. The
model was slowing down and sinking. Already low and ensuring
that I always turned away from the stuck-out spoiler, to
avoid what could be a nasty tip stall and inability to
recover, it was hard to get to a landing position. I finally
manage to line the model up on the face of the slope and
made an abrupt but safe landing…… On retrieving the model I
noticed a strong smell of burnt electrics coming from the
open airbrake.
With shaking hands I poured a
cup of coffee and tried to analyse what had gone wrong by
viewing the video and photos that had been taken. I was
please with the flight but really concerned about the
failure. With all the electrics disconnected, I settle down
to enjoy the remainder of Friday afternoon flying my other
models, there would beplenty of time to fault find when I
got back into the workshop. Following an excellent flying
session at around 6pm, we headed back to our accommodation
for our last night of the holiday and to celebrate what I
think was generally a successful Genesis Test flight… the
model flies well, but I need to understand what caused the
failure….… Party on!
Saturday Morning and after a
thorough clean up of the holiday accommodation, we left for
our respective homes as our modelling expedition and
memorable events had come to an end.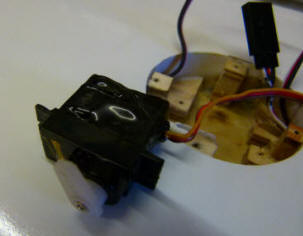
Back in the workshop, I
removed the cover from the airbrake servo to find a molten
mess that was once a servo……. you can even see the heat
damage to the servo bay.
I have analysed the problem
that caused the total failure of the left hand spoiler
servo. In fact, whilst the servos on the spoilers could have
been of better quality and will be replaced, to be fair, the
problem was my own doing.
Having tried a few different
receivers and other servos it has become apparent that the
2.4GHz receiver was programmed for High Speed operation.
According to the instructions, this mode of operation is not
suitable for analogue servos. Guess what, the spoiler servos
and tow release servo are Analogue! All the primary controls
were driven by digital servos, so they were ok. The clue to
this was the constant buzzing from the analogue servos, not
the one fitted, these did not buzz at all. The alternative
servos I used during the fault analysis, something that was
not apparent when the model was initially set up. There is
a flashing LED on the receiver that indicates the mode, but
unless you are aware that the LED flashes at different rates
and different receivers give different indications then this
is not readily apparent. The problem was also apparent on
one of my other receivers when switched to HS mode.
With the receiver suitable
re-programmed to normal mode, suitable for both digital and
analogue servos, the problem has been corrected.. No servo
buzz and all the right indications from the receiver LED.
All my receivers have now bee re-programmed, Lesson learned!
WARNING:
Please check that your
receivers are set for correct speed especially if you are
using analogue servos, my experience could have resulted in
more than a melted servo; I was lucky.
Anyway, Replacement servos
have been ordered, and I'm in the process of replacing the
wiring loom. Additionally, I am looking at different methods
of launching Genesis from a hill, possibly by using a
bungee, and of course there is also the option of an aerotow
at some time in the future.
Enjoy the photos. I hope to
bring you the videos soon.
More flights to follow.
Colin W
|
|
June 2014
One Year On....... |
|
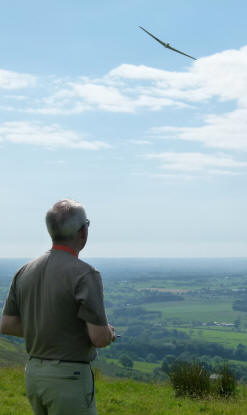 One
Year on, time, weather and other factors have not been on my
side when it comes to flying my scale models, especially
when it comes to actually getting the Genesis out of the
hangar and in the air. I haven't been inactive though. I
have designed a new sport model - the "Midge" see the other
model articles, and I have also made a CNC machine to cut
foam wings also featured in the "How-To" pages. One
Year on, time, weather and other factors have not been on my
side when it comes to flying my scale models, especially
when it comes to actually getting the Genesis out of the
hangar and in the air. I haven't been inactive though. I
have designed a new sport model - the "Midge" see the other
model articles, and I have also made a CNC machine to cut
foam wings also featured in the "How-To" pages.
However, A friend and
colleague from work who has helped motivate me in getting my
CNC machine off the drawing board and finally sorted, asked
if I was going flying last weekend as he would like to come
along and it would be good to see the Genesis fly.. Well
he'd done his homework; he'd checked the weather forecast
and the wind direction (NNW) was suitable for Jeffery Hill.
For those that do not know the local topography, this means
I can park at the top of the hill and have just a short walk
to the actual slope, ideal for taking the scale models out.
the wind direction was accurate on the day, but the wind
speed was not so encouraging, so I went prepared with
various models. Whilst the wind was particularly light and
variable before lunch the wind gradually pick up as the day
progressed and by around 4pm, was sufficient to get the
Genesis out of the car.
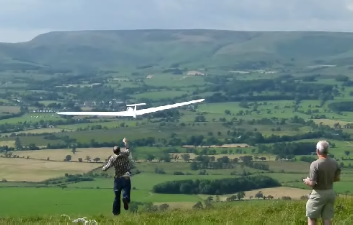 I
had taken a short elastic bungee to launch the model with,
but due to the long grass this was not effective. A local
modeller who had been flying his F3F model and Vector came
to the rescue. An experience modeller with a definite height
advantage over me as he is much, much taller, he was able to
provide a good launch to get the Genesis away. This was only
the second flight for the Genesis, so some trim adjustment
was necessary. Shortly after launch the wind again shifted
and reduced in velocity, which reduced the amount of lift
and I struggled to gain much height, but I was able to get
more of a feel for the model, I reckon it could use a little
more nose weight as it seems a little sensitive on the
elevator. I was able to fly the model for around 10
minutes, although it seems more like hours before I had to
get the model into a good position for an approach and
landing parallel to the slope. The landing was uneventful,
and I hadn't really much to worry about as the model was
very well behaved during the approach landing using the
spoilers. Anyway, my good lady wife was able to take some
photos which I have included here. More flights to follow
soon I hope, but who know when, but I really would like to
get more familiar with its handling characteristics, and
become more comfortable with flying it. You've got to admit
though, it does look good in the air. I
had taken a short elastic bungee to launch the model with,
but due to the long grass this was not effective. A local
modeller who had been flying his F3F model and Vector came
to the rescue. An experience modeller with a definite height
advantage over me as he is much, much taller, he was able to
provide a good launch to get the Genesis away. This was only
the second flight for the Genesis, so some trim adjustment
was necessary. Shortly after launch the wind again shifted
and reduced in velocity, which reduced the amount of lift
and I struggled to gain much height, but I was able to get
more of a feel for the model, I reckon it could use a little
more nose weight as it seems a little sensitive on the
elevator. I was able to fly the model for around 10
minutes, although it seems more like hours before I had to
get the model into a good position for an approach and
landing parallel to the slope. The landing was uneventful,
and I hadn't really much to worry about as the model was
very well behaved during the approach landing using the
spoilers. Anyway, my good lady wife was able to take some
photos which I have included here. More flights to follow
soon I hope, but who know when, but I really would like to
get more familiar with its handling characteristics, and
become more comfortable with flying it. You've got to admit
though, it does look good in the air.
I hope to
get more air time soon.
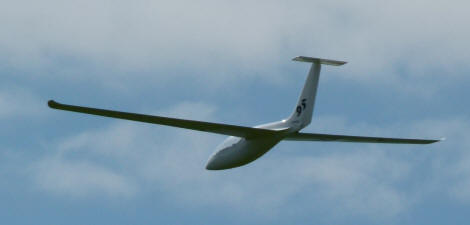
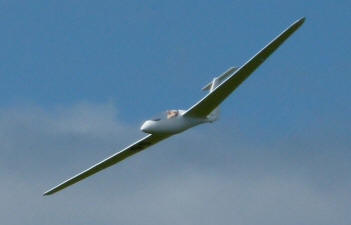
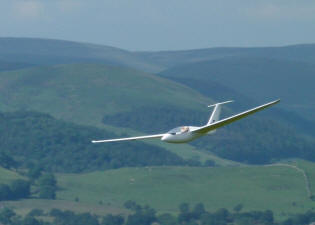
This last photo is the actual full size
aircraft included for comparison
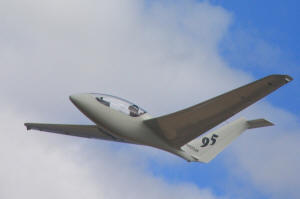
|
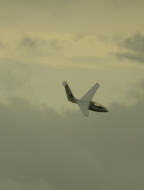 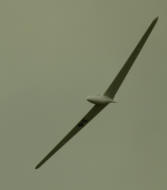 August
2014 - another trip to the Long Mynd and another good
day for Genesis which flew particularly well and whose
flight envelope was explored and expanded to include mild
aerobatics. see the
Circles and Slopes news a August
2014 - another trip to the Long Mynd and another good
day for Genesis which flew particularly well and whose
flight envelope was explored and expanded to include mild
aerobatics. see the
Circles and Slopes news a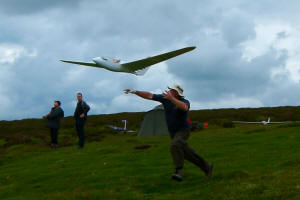 r r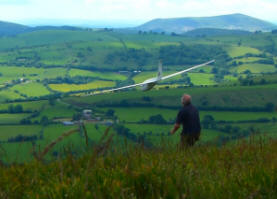 ticle. ticle.
|
|
|
|
Related Slope-Dudes Articles:
Three Go Mad in Shropshire
A New Beginning
Circles and Slopes
|
|
June
2015 - A Trip to
Royal Air Force Digby, Lincolnshire to attend a RAFMAA
thermal soaring event saw Genesis take to the air - By
Aerotow. Yes you
read the title correctly, Saturday saw a very nice warm
sunny day, with a steady breeze from the West, South West.
The RAFMAA event was
arranged to hold a gliding competition, but given the
direction and types of models most people owned, there
weren't many of us that had suitable models for a
competition. However I had taken both my scale models. The 3
metre Pilatus B4 and the Genesis. Neil also took his Pilatus
B4 and the Labelle along with the Glider Tug.
The Pliatus models were
first to take flight behind the tug with the help of a
fellow modeller, Dave Rumble who flew the tug whilst Neil
and I enjoyed the challenge of aerotowing and silent flight;
the models performed well.
Later in the afternoon, I
decided to assemble the Genesis and lined this up rather
nervously behind the tug. All the necessary checks were
completed and the slack taken up in the tow line, the tug
initially struggles to get the Genesis moving off the grass
but it soon got up to speed. However the bumpy nature of the
sports field got the better of the Genesis and the tow line
was released as the Tug leapt into the air.
The models were recovered
back to the start and lined up again for a second attempt.
The tug was given full powered from the start which got the
Genesis moving quickly and it quickly lifted off from the
grass and serenely floated low behind the tug until it also
lifted off and started to climb away. Keeping the wings
level and having popped hte airbrakes slightly to provide a
little drag to stop it catching and overtaking the tug, a
technique used with the Pilatus. All was well as they both
climbed away into wind and a gentle turn to the right was
executed with both models moving fast but well behaved.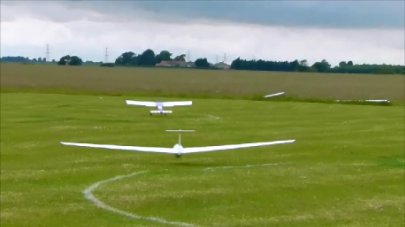 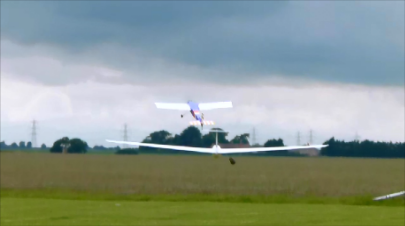 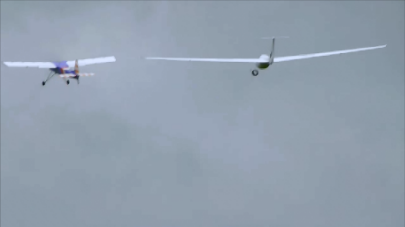
When tug and glider was
turned back into wind, the genesis flight path got a little
untidy. It was catching up to the tug quickly which had
seemed to turn a little quicker than expected, with a view
of situation quickly developing with the towline threatening
to loop behind the Genesis wing and corrective action with
the genesis was taken to turn away from the loop in the
line.
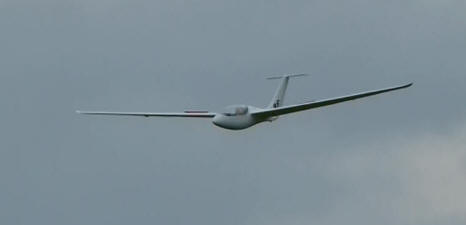 In
hind site, I should have released at the first indications
of the developing situation, but before my hand could select
the switch, the Tug finally the towline which caused Genesis
to yaw violently resulting a tip stall. At this point both I
and the Tug pilot hit the tow release, the towline release
successfully from both aircraft and floated down wind as I
recovered from the stall. The tug was unaffected and flew
around at distance while I got the Genesis under control.
Not knowing what damage may have been inflicted on the
Genesis, I decided to keep the speed on and perform a rapid
decent and landing which given the circumstances was a
fairly innocuous landing albeit a little fast. In
hind site, I should have released at the first indications
of the developing situation, but before my hand could select
the switch, the Tug finally the towline which caused Genesis
to yaw violently resulting a tip stall. At this point both I
and the Tug pilot hit the tow release, the towline release
successfully from both aircraft and floated down wind as I
recovered from the stall. The tug was unaffected and flew
around at distance while I got the Genesis under control.
Not knowing what damage may have been inflicted on the
Genesis, I decided to keep the speed on and perform a rapid
decent and landing which given the circumstances was a
fairly innocuous landing albeit a little fast.
In reflection, I felt that
during the stall recovery, the pitch control was somewhat
lacking during high speed, whilst I had control in reserve
by deselecting the rate switch,
something didn't seem right. On inspection, although there
was no damage to the model, the elevator could be stalled
with pressure to the control surface, which would account
for the seemingly lack of pitch response. I need to check
out the servo and control geometry.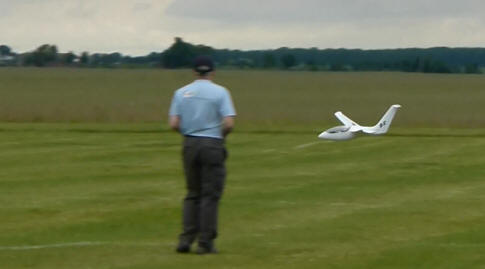
The main lesson
though, is don't be a hero and try to recover a very slack
towline, especially in the turn, hit the release before any situation gets out of
hand.
I must admit, The Genesis
looked very impressive taking off behind the tug and hope
that we can reconvene again soon to get some better photos
and video.
CW
2016
The Genesis has been entered
in a number of scale events this year (2016). firstly the
Leek and Moorland event in August and came first in the
modern class. A few weeks later I entered in the Long Mynd
scale event and came second place. This event was also
featured in the January 2017 edition of the RC model World
Magazine which the Genesis 2 received some great publicity. |
|
|
|
Additional Genesis_build_photos.htm |
|
Back to top |
Anyone wanting to contact me regarding Genesis 2 Scale Model,
please send me an email "colin1" at the website address
"slope-dudes.co.uk"
|
|
)
)
)
)
)
)
)
)
)
)
)